These chocolate coconut bars are a little piece of childhood wrapped in a homemade package. I remember sneaking bites from the pan, sticky fingers and all, feeling the crunch of toasted coconut and the smooth melt of rich chocolate. Making them at home turns that nostalgic rush into a quiet, messy joy that I can control—less greasy, more wholesome, and infinitely customizable.
What I love most is how forgiving this recipe is, almost like a good story that gets better with each telling. A handful of ingredients, a few simple steps, and suddenly you’re holding something that’s both familiar and new. It’s the kind of treat that’s perfect for a quick afternoon pick-me-up or a lazy weekend project, especially when you want to indulge without guilt or fuss.
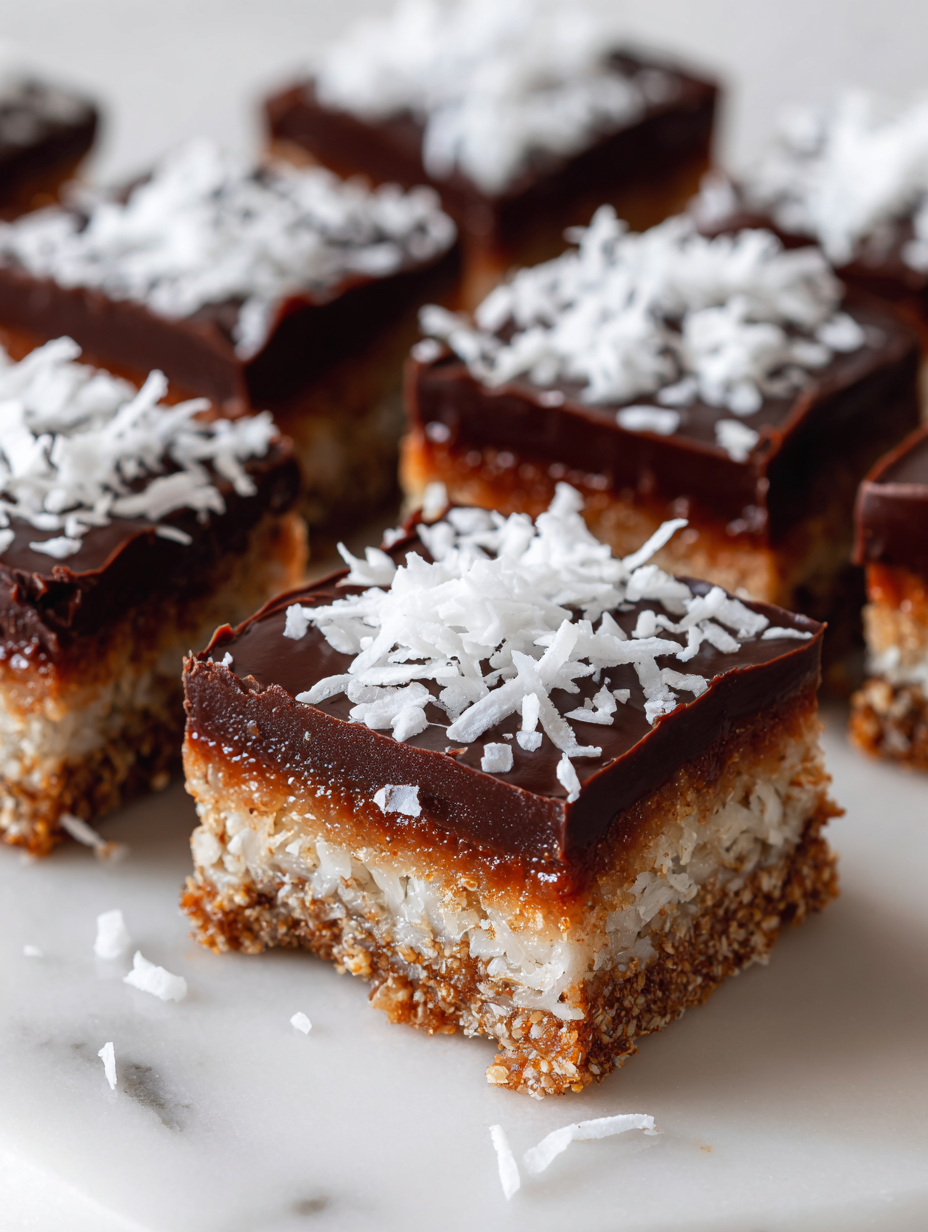
Focusing on the nostalgic comfort of childhood treats, this recipe elevates simple chocolate coconut bars by emphasizing the homemade process and ingredient quality, transforming a familiar snack into a rich, satisfying dessert that recalls carefree afternoons and shared family moments.
The story behind this recipe
- This recipe is inspired by a lazy afternoon in my childhood kitchen, where my grandma’s hands would expertly mix, toast, and pour. Those simple moments—smelling toasted coconut and melting chocolate—stuck with me. Now, I chase that nostalgic warmth whenever I make these bars, feeling connected to those carefree days.
- I’ve tweaked the original to make it a bit more forgiving, less sticky, and easier to customize. It’s a reminder that comfort food doesn’t have to be complicated, just honest and a little messy. Sometimes, the best recipes are the ones you can throw together with whatever you’ve got and still end up with something special.
- heading: ‘The story behind this recipe’
Key ingredients and tips
- Coconut flakes: I love using toasted, flaky coconut that crackles with a smoky aroma, adding depth to each bite. If you prefer a softer texture, go for sweetened shredded coconut instead.
- Dark chocolate: I prefer a 70% cocoa bar for a bittersweet punch, but you can swap in milk chocolate for a creamier, sweeter result—just watch it melt faster.
- Sweetened condensed milk: This binds everything together with a rich, gooey sweetness. If you want a lighter version, try coconut cream, but expect a less sticky, more delicate bar.
- Butter: I use unsalted butter, which gives a mellow richness, but coconut oil works well if you want dairy-free and adds a faint tropical scent. Adjust for a slightly firmer texture.
- Vanilla extract: Just a splash deepens the flavor and rounds out the sweetness. Skip if you want a more intense coconut or chocolate flavor—sometimes less is more.
- Salt: A pinch enhances all the flavors and cuts through the sweetness. If you’re feeling adventurous, a tiny sprinkle of sea salt flakes on top before chilling makes a nice contrast.
- Optional add-ins: Dried cherries or chopped nuts can add a surprising crunch or tartness. I toss in a handful for a bit of chaos—try your favorites!
Spotlight on key ingredients
Coconut flakes:
- Toasted until golden, they crackle with smoky richness and add a chewy texture that contrasts with the smooth chocolate. Opt for flaky or shredded based on desired chewiness.
- Dark chocolate: Melts into a glossy, bittersweet layer with a faint smoky aroma. Use a bar with at least 70% cocoa for depth, or swap with milk chocolate for a creamier, sweeter finish, but watch for quicker melting.
Dark chocolate:
- Sweetened condensed milk: Thick, gooey, and intensely sweet, it binds the bars together with a rich creaminess. For a lighter, dairy-free version, coconut cream works but results in a softer, less sticky texture.
- When melted, it turns silky and shiny, coating the coconut base with a bittersweet punch. Its behavior during melting requires gentle heat to avoid scorching, ensuring a smooth pour.
Notes for ingredient swaps
- Dairy-Free: Swap butter for coconut oil. It keeps the bars rich but adds a tropical aroma, slightly different texture.
- Vegan: Use coconut condensed milk or a thick coconut cream instead of regular condensed milk for a dairy-free, lush result.
- Sugar-Free: Replace sweetened condensed milk with a sugar-free caramel or a homemade coconut cream sweetened with a sugar substitute.
- Chocolate Variations: Milk chocolate for a sweeter, creamier flavor; or white chocolate for a sweeter, milky taste with a buttery finish.
- Coconut Types: Use unsweetened shredded coconut for a more natural flavor, or sweetened for extra sweetness and chewiness.
- Add-ins: Chopped dried fruits or nuts can be swapped based on preference—think tart cherries or crunchy almonds for more texture.
- Flavor Boost: A dash of coffee powder or a sprinkle of cinnamon can add depth—use sparingly to keep the balance.
Equipment & Tools
- 20x20cm baking pan: To hold and shape the bars during chilling.
- Heatproof spatula: To stir and spread melted chocolate smoothly.
- Saucepan: For melting chocolate and butter gently.
- Mixing bowl: To combine ingredients and fold in coconut.
Step-by-step guide to chocolate coconut bars
- Gather your equipment: a 20x20cm (8×8 inch) baking pan, a heatproof spatula, a saucepan, and a mixing bowl. Preheat your oven to 180°C (350°F).
- Toast the coconut: spread 2 cups of shredded coconut on a baking sheet. Bake for 5-7 minutes, stirring halfway, until golden and fragrant. Set aside to cool.
- Melt the chocolate: chop 1 cup of dark chocolate (70%) into small pieces. Melt over a double boiler or in a microwave in 30-second bursts, stirring each time until smooth. Watch for over-torched edges.
- Combine the base: in a mixing bowl, stir together 1 cup of sweetened condensed milk, 1/2 cup of unsalted butter (melted), and 1 teaspoon of vanilla extract until well blended.
- Mix in toasted coconut: fold in the cooled toasted coconut, ensuring even distribution. If the mixture feels too thick, add a teaspoon of coconut oil for easier mixing.
- Assemble the bars: press the coconut mixture evenly into the prepared baking pan, smoothing the top with a spatula. Chill in the fridge for 15 minutes to set slightly.
- Add the chocolate topping: pour the melted chocolate over the coconut base, spreading evenly. Tap the pan gently to remove air bubbles and ensure a smooth surface.
- Set in the fridge: refrigerate for at least 2 hours, or until the chocolate is firm and the bars are solid. For best results, cover loosely with plastic wrap to prevent moisture.
- Cut into squares: once fully chilled and set, use a sharp knife to cut into 16 equal pieces. Wipe the knife clean between cuts for clean edges.
- Finish and serve: lift the bars out of the pan using the edges of parchment paper. Optional: sprinkle a pinch of sea salt flakes on top before serving to enhance flavor.
Chill the assembled bars in the fridge for at least 2 hours until firm. Lift out with parchment, cut into squares, and serve. Optional: add a sprinkle of sea salt on top for contrast.
How to Know It’s Done
- Coconut is golden and fragrant after toasting.
- Chocolate is smooth and shiny after melting.
- Bars are firm and set after refrigeration.
Chocolate Coconut Bars
Ingredients
Equipment
Method
- Preheat your oven to 180°C (350°F) and spread the shredded coconut evenly on a baking sheet. Toast for 5-7 minutes, stirring halfway, until golden and fragrant. Set aside to cool.
- Chop the dark chocolate into small pieces and melt it gently over a double boiler or in short bursts in the microwave, stirring until smooth and glossy.
- In a mixing bowl, combine the sweetened condensed milk, melted butter, and vanilla extract. Stir until smooth and well integrated.
- Fold in the cooled toasted coconut into the wet mixture, ensuring an even distribution. If the mixture feels too thick, add a teaspoon of coconut oil to help it come together.
- Press the coconut mixture firmly into the prepared baking pan, spreading it out evenly with a spatula. Chill in the fridge for 15 minutes to set slightly.
- Pour the melted chocolate over the chilled coconut base, spreading it into an even layer. Gently tap the pan to smooth out the surface and remove air bubbles.
- Sprinkle a pinch of sea salt flakes on top for added flavor contrast, if desired. Cover loosely and refrigerate for at least 2 hours, or until the chocolate is firm and the bars are set.
- Once chilled, lift the bars out of the pan using the edges of parchment paper and cut into 16 equal squares with a sharp knife. Wipe the knife clean between cuts for tidy edges.
- Serve the bars immediately or store them in an airtight container in the fridge for up to 5 days. For longer storage, wrap tightly and freeze, thawing before serving.
Pro Tips for Perfect Bars
- Bolded mini-head: Use medium-low heat when melting chocolate to prevent scorching and achieve a glossy finish.
- Bolded mini-head: Toast coconut until just golden and fragrant—over-toasting can turn bitter and ruin texture.
- Bolded mini-head: Chill the assembled bars thoroughly, ideally overnight, for cleaner cuts and better flavor melding.
- Bolded mini-head: Wipe your knife clean between cuts for sharp, tidy edges without crumbling.
- Bolded mini-head: Slightly warm the spatula before spreading chocolate for a smoother, more even layer.
- Bolded mini-head: Incorporate a pinch of sea salt flakes on top before chilling to enhance the sweetness and add contrast.
- Bolded mini-head: If the chocolate sets too quickly, gently rewarm it in a warm water bath for a few seconds to keep it workable.
Common mistakes and how to fix them
- FORGOT to watch chocolate: Over-torched chocolate becomes grainy. Use low heat and stir constantly.
- DUMPED too much salt: Too much salt overwhelms flavors. Use a pinch and taste before adding more.
- OVER-TORCHED coconut: Burnt coconut tastes bitter. Keep an eye and stir frequently during toasting.
- MISSED chilling time: Rushing fridge causes bars to be soft. Chill at least 2 hours for firm texture.
Fast fixes for common mishaps
- If chocolate seizes, splash in a teaspoon of warm coconut oil to smooth it out.
- When coconut is burnt, quickly add a splash of water to stop the toasting process and start anew.
- DUMPED too much salt? Rinse the mixture with a tiny bit of warm water and adjust later.
- Over-torched coconut? Immediately remove from heat and stir in a touch of butter to mellow the bitterness.
- Splash a few drops of vanilla extract on the chocolate if it thickens or starts to crackle during melting.
Prep, store, and reheat tips
- Prepare and toast the coconut a day ahead to deepen flavor and reduce prep time on baking day.
- Store the assembled but unchocolate-coated base in an airtight container in the fridge for up to 24 hours; it firms up nicely and makes assembly easier.
- Keep the finished bars covered tightly in the fridge for up to 5 days; the coconut keeps its chewy texture and chocolate stays glossy.
- Reheat individual bars briefly in the microwave—10 seconds—until the chocolate just softens and releases a rich, cocoa aroma. Do not overheat to avoid melting the chocolate completely.
- For longer storage, freeze the bars wrapped well in plastic wrap and foil for up to 1 month; thaw in fridge before serving, noting that coconut might become slightly softer and the chocolate may soften a bit.
Top questions about chocolate coconut bars
1. Can I use shredded coconut instead of flakes?
Yes, using shredded coconut will change the texture, making it less chewy and more crumbly.
2. Can I substitute milk chocolate?
Absolutely, swapping dark chocolate for milk chocolate makes it sweeter and creamier, but watch it melt faster.
3. Can I make this dairy-free?
Using coconut oil instead of butter keeps it dairy-free and adds a subtle tropical aroma, though the texture might be slightly softer.
4. How long should I chill the bars?
Chilling for at least 2 hours ensures the bars are firm and the chocolate is set properly, making cutting easier.
5. What if the chocolate is too thick?
If the chocolate is too thick to spread, gently warm it in a double boiler or microwave for 10 seconds for easier pouring.
6. How do I melt chocolate without burning it?
To prevent burning the chocolate, melt over low heat and stir frequently, watching for a shiny, smooth finish.
7. Should I add salt on top?
Adding a pinch of sea salt flakes on top before chilling enhances the flavors and creates a nice contrast.
8. How should I store these bars?
Storing them in an airtight container in the fridge keeps the bars fresh for up to 5 days; freeze for longer storage.
9. Can I reheat the bars?
Reheat in the microwave for about 10 seconds until just soft, for serving warm and more indulgent.
10. Can I customize the add-ins?
Yes, adding chopped dried cherries or nuts can introduce a tart or crunchy surprise in each bite.
Making these chocolate coconut bars is a small act of nostalgia, bringing back afternoons filled with sticky fingers and the sweet smell of toasted coconut. They’re imperfect, just like those childhood treats, but with a deeper, richer flavor that feels like a quiet celebration of simple ingredients. Sometimes, it’s these little projects—messy and honest—that remind us how comforting a homemade treat can be.
In the end, these bars aren’t just a dessert; they’re a reminder to slow down, savor each bite, and enjoy the messy, sweet moments that make life a little brighter.
type: outro_response

Hi, I’m Ava Bennett. Welcome to Glowing With Pride. I’m Ava Bennett, a professional chef, recipe developer, and lifelong believer that food is one of the most powerful ways we express love, identity, and joy. This space was created from years of working in professional kitchens, countless late nights behind the line, and a deep desire to share food in a way that feels personal, proud, and purposeful. Cooking has never just been my career. It has been my language.


Leave a Reply