These chocolate almond bars are all about that perfect crunch meeting silky chocolate, a texture dance that keeps drawing me back. I love how the toasted almonds add a nutty, smoky depth that contrasts beautifully with the sweet, rich chocolate layer. It’s a simple combo, but getting that balance right feels like a small victory every time I make these.
What really makes these bars stand out is the way the crunch from the almonds plays against the smooth, almost melt-in-your-mouth chocolate. It’s such a satisfying mix, especially when you get that first bite—crackly, then creamy, with a hint of toasted warmth. They’re my go-to for when I want a treat that feels indulgent but isn’t overly fussy to put together.
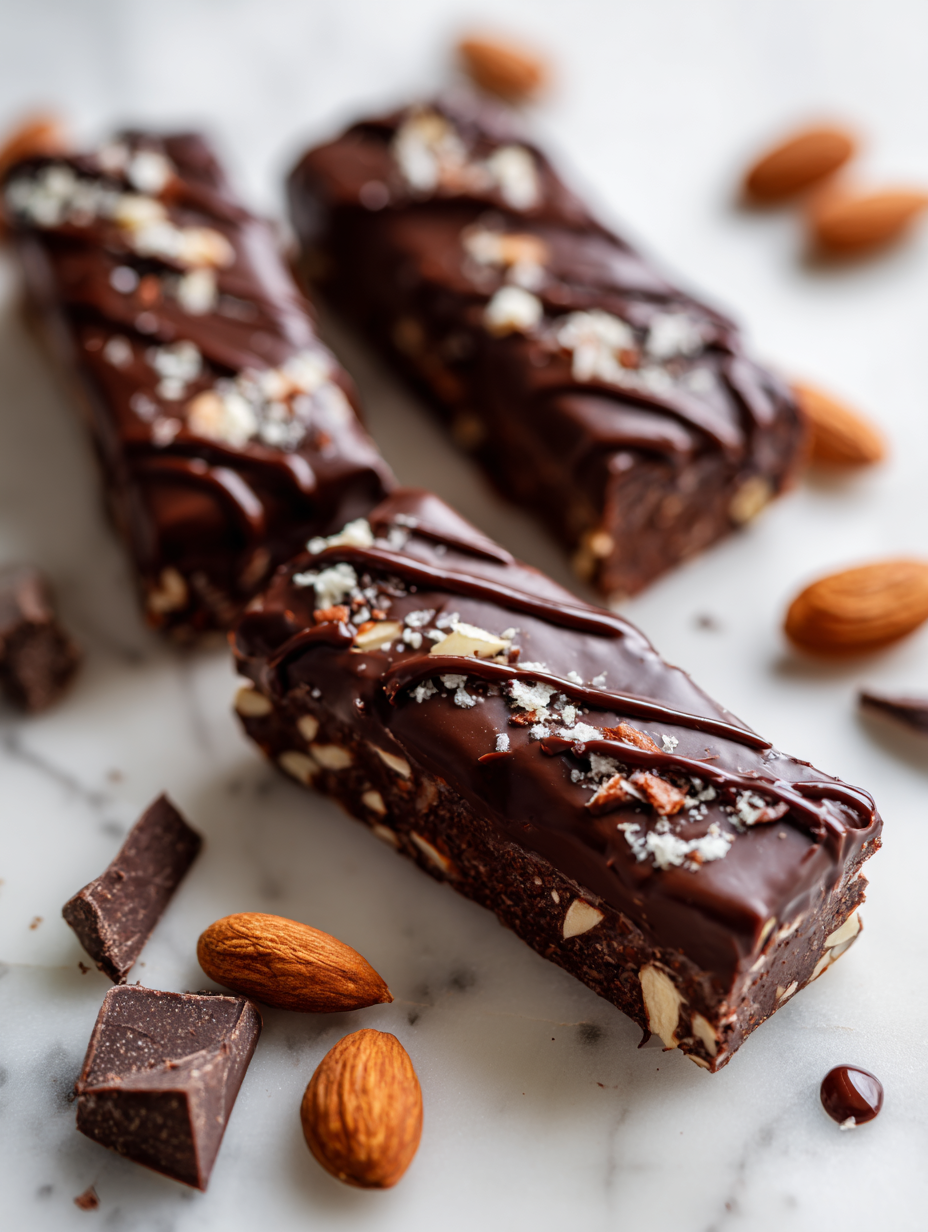
Focusing on the overlooked art of balancing richness and crunch in homemade chocolate almond bars, emphasizing how the texture contrast elevates the simple ingredients into an indulgent yet approachable treat.
The story behind this recipe
- This recipe came together during a lazy weekend, when I desperately needed a sweet fix but wanted something more than just store-bought bars. I remember the first batch being a bit of a happy accident—over toasted almonds, melting chocolate, and a whole lot of tasting and tweaking. It’s one of those recipes that sticks in your mind because of how straightforward yet satisfying it is.
- I love how the combination of toasted almonds and rich chocolate reminds me of simpler times—picnics on the grass, my grandma’s kitchen aroma, those small moments of unplanned joy. Now, every time I make these, it’s like a little ritual that reconnects me to those quiet, cozy mornings.
- heading:
Ingredient breakdown: key components
- Good quality dark chocolate: I use 70% cacao for that deep, smoky richness that melts smoothly. You can swap in milk chocolate if you prefer sweeter, but it won’t have that intense cocoa punch.
- Toasted almonds: I love the nutty aroma when almonds are toasted until golden and fragrant. If you’re pressed for time, use pre-toasted almonds, but fresh toasting adds a smoky depth you can’t beat.
- Butter: I opt for unsalted butter for control over salt levels and flavor. If you want a dairy-free version, coconut oil works but gives a slightly different, more coconut-forward taste.
- Sweetened condensed milk: It keeps the bars fudgy and cohesive. For a lighter option, try evaporated milk with a touch of honey—just expect a slightly less gooey texture.
- Vanilla extract: I insist on real vanilla for that warm, aromatic hint. You can experiment with vanilla bean paste for extra flecks and a richer flavor experience.
- Sea salt: Just a pinch to enhance the chocolate’s depth. A sprinkle of flaky sea salt on top right before chilling adds a lovely contrast and crunch.
- Optional: Dried cherries or cranberries: I love the tart pop they add. If you skip them, these bars are still decadently chocolatey and nutty—just a bit more classic.
Spotlight on key ingredients
Chocolate & Almonds:
- Dark chocolate: I love using 70% cacao for its rich, smoky depth that melts smooth and coats evenly. If you prefer sweeter, try milk chocolate, but beware—it’s less intense and more sugary.
- Toasted almonds: They bring that irresistible nutty aroma and crunch. Toast until golden and fragrant—if you skip this step, the bars miss out on that smoky, warm note.
Notes for ingredient swaps
- Dairy-Free: Swap regular butter for coconut oil. It adds a slight coconut aroma and a different melt-in texture.
- Chocolate: Use milk chocolate instead of dark for a sweeter, creamier bite—less intense cocoa flavor, more mellow sweetness.
- Sweetener: Replace sweetened condensed milk with coconut condensed milk or honey-thinned with a bit of warm water for similar gooeyness.
- Nuts: Cashews or hazelnuts can replace almonds for a different nutty profile and softer crunch, though toast them first for flavor.
- Add-ins: Dried cherries or cranberries can be swapped for dried apricots or raisins, adding varied tartness or sweetness.
- Salt: Flaky sea salt can be replaced with smoked salt for a smoky contrast or omitted if you prefer a more straightforward sweetness.
- Flavor Boost: Vanilla extract can be substituted with almond extract for a more pronounced, nutty aroma or skipped for a purer chocolate taste.
Equipment & Tools
- Baking pan: Holds the mixture and shapes the bars.
- Parchment paper: Prevents sticking and makes removal easy.
- Double boiler or heatproof bowl: Melts chocolate gently without scorching.
- Spatula: Mixes and presses the mixture evenly.
- Sharp knife: Cuts the set bars cleanly.
Step-by-step guide to chocolate almond bars
- Equipment & Tools: Line a 9×9 inch (23×23 cm) baking pan with parchment paper, leaving overhang for easy removal. Use a heatproof spatula for mixing and a small saucepan for melting chocolate. Have a spatula and a sharp knife ready for cutting.
- Toast the almonds: Spread 1 cup of sliced almonds on a baking sheet. Bake at 180°C (350°F) for 8-10 minutes until fragrant and golden. Shake halfway through. Cool completely.
- Melt the chocolate: In a double boiler or a heatproof bowl over simmering water, melt 1 ½ cups of dark chocolate until smooth. Stir occasionally. Remove from heat and set aside.
- Prepare the base: In a mixing bowl, combine ½ cup of unsalted butter, 1 can (14 oz) of sweetened condensed milk, and 1 tsp of vanilla extract. Warm gently over low heat or microwave in 20-second bursts until melted and combined. Mix well.
- Combine ingredients: Stir the toasted almonds into the melted butter mixture. Pour the chocolate into the bowl and fold gently until evenly coated and combined. The mixture should be thick, glossy, and slightly sticky.
- Assemble the bars: Transfer the mixture to the prepared pan. Use a spatula to press it evenly into the pan, smoothing the top. Chill in the refrigerator for at least 2 hours, or until firm.
- Final layer: Once set, melt an additional ½ cup of chocolate if needed for a topping. Spread over the chilled mixture for a glossy finish. Chill again for 30 minutes.
- Cut and serve: Use the overhang to lift the set block from the pan. Use a sharp knife to cut into bars, about 1.5 inches (4 cm) thick. Store in an airtight container in the fridge.
- Resting & Finishing: Let the bars sit at room temperature for 10 minutes before serving to soften slightly. For cleaner cuts, wipe the knife between slices. Serve with a cup of coffee or a glass of milk.
- Checkpoints & How to Know It’s Done: The chocolate should be glossy and set, not sticky. The bars should hold their shape without cracking. The edges should be clean and smooth when cut.
Chill the bars until fully set, then let sit at room temp for 10 minutes before slicing. Keep in an airtight container in the fridge for up to a week. Serve directly from fridge or at room temp for softer texture.
How to Know It’s Done
- Chocolate is fully melted and smooth, with no lumps.
- Almond mixture is firm and holds shape when pressed.
- Bars are cool and set, with a glossy top layer.
Chocolate Almond Bars
Ingredients
Equipment
Method
- Line your baking pan with parchment paper, leaving some overhang for easy removal. Preheat your oven to 180°C (350°F).
- Spread the sliced almonds evenly on a baking sheet and toast in the oven for 8-10 minutes until golden and fragrant. Shake the pan once or twice to ensure even toasting. Let them cool completely.
- Place the dark chocolate in a heatproof bowl set over simmering water or a double boiler. Gently melt the chocolate, stirring occasionally, until smooth and glossy. Remove from heat and set aside.
- In a mixing bowl, combine the melted butter, sweetened condensed milk, and vanilla extract. Warm slightly if needed to loosen, then whisk until the mixture is smooth and cohesive.
- Fold the toasted almonds into the buttery mixture, ensuring they are evenly distributed. Then, gently fold in the melted chocolate until all ingredients are well combined and the mixture is thick and sticky.
- Transfer the mixture into the prepared pan. Use the back of a spatula to press it firmly into an even layer, smoothing the top as much as possible.
- Place the pan in the refrigerator and chill for at least 2 hours, or until the mixture is firm and set.
- Once set, melt an additional small amount of chocolate if desired for a glossy top layer. Spread over the chilled mixture, then sprinkle lightly with sea salt for added flavor and crunch.
- Return the pan to the fridge for another 30 minutes to set the top layer. Then, use the parchment overhang to lift the block from the pan. Use a sharp knife to cut into bars of your preferred size.
- Serve these bars at room temperature for a softer bite or straight from the fridge for a crunchier texture. Enjoy the perfect balance of crackly almond and silky chocolate with every bite!
Notes
Tips & Tricks for Perfect Bars
- Bold chocolate: Use high-quality chocolate that melts evenly and has a rich aroma—less bitter, more indulgent.
- Toasted almonds: Toast until fragrant and golden—this boosts flavor and adds a satisfying crunch with every bite.
- Gentle melting: Use a double boiler or microwave in short bursts—avoid scorching to keep that silky, glossy finish.
- **Press firmly: Use the back of a spatula to press the mixture into the pan—ensure an even, compact layer for clean cuts.
- **Chill thoroughly: Let the bars set in the fridge for at least 2 hours—this prevents cracking and makes slicing smoother.
- **Room temp serve: Bring to room temperature for 10 minutes before cutting—enhances flavor and softens the texture just right.
- **Knife care: Wipe the blade between cuts—keeps edges clean and prevents sticking, for perfect, neat bars.
Common mistakes and how to fix them
- FORGOT to preheat oven? Warm it first to avoid soggy bars.
- DUMPED in too much salt? Use less or skip for balanced sweetness.
- OVER-TOASTED almonds? Keep a close eye to prevent bitterness.
- MISSED chilling time? Ensure bars are firm before cutting for clean slices.
Quick fixes for common issues
- When chocolate seizes, splash in a teaspoon of warm coconut oil to smooth it out.
- If bars crumble when cutting, chill them longer or run the knife under hot water first.
- DUMPED in too much salt? Rinse the almonds quickly, then toast again to reset flavor.
- Splash a bit of milk or cream if the chocolate layer looks dull or isn’t setting properly.
- Patch a crackly top by gently reheating with a spoonful of warm chocolate, then smooth with spatula.
Prep, store, and reheat tips
- Prepare the chocolate mixture and toast almonds up to two days ahead; store separately in airtight containers in the fridge. The nuts will stay crunchy and fragrant, while the chocolate remains fresh and smooth.
- Assemble and press the bars into the pan a day in advance. Wrap tightly with plastic wrap and refrigerate. The flavors meld overnight, and the texture firms up, making slicing easier.
- Bars will keep well for up to a week in the fridge, maintaining their crunch and glossy appearance. For longer storage, freeze wrapped bars for up to a month; thaw in the fridge before serving.
- Reheat sliced bars in a low oven (about 150°C/300°F) for 5–7 minutes or until slightly warmed and the chocolate softens. The aroma of toasted almonds and melted chocolate should waft up, inviting you to indulge.
Top questions about chocolate almond bars
1. How can I tell if the chocolate is melted properly?
Look for smooth, glossy chocolate that melts easily. If it’s dull or grainy, it might be old or overheated.
2. Should I toast the almonds beforehand?
Use fresh, toasted almonds for that perfect crunch and smoky aroma. Pre-toast if you’re short on time, but fresh is best.
3. How do I know when the bars are set?
Chill the bars until firm, at least 2 hours. They should hold shape, with a shiny top and no sticky edges.
4. What if the mixture is too sticky to press into the pan?
If the mixture feels too sticky, add a touch more crushed almonds or a little extra melted chocolate to balance.
5. Can I substitute dark chocolate with milk chocolate?
Yes, swapping dark for milk chocolate makes it sweeter and creamier, but reduces that deep cocoa punch.
6. How should I store these bars?
Store in an airtight container in the fridge for up to a week. Let sit at room temp for 10 minutes before serving.
7. How do I get neat, clean slices?
Use a sharp, warm knife for clean cuts. Wipe the blade between slices to prevent sticking and jagged edges.
8. What if the bars crack when I cut them?
If the chocolate cracks or cracks appear when cutting, chill the bars longer or run the knife under hot water before slicing.
9. Can I add salt on top?
Adding a sprinkle of flaky sea salt just before chilling enhances flavor and adds a satisfying crunch.
10. How do I know the chocolate is hot enough for pouring?
When the chocolate layer crackles or shimmers, it’s a sign it’s properly melted and ready for pouring.
Taking the time to balance that first crispy crunch with the smooth, rich chocolate makes all the difference. These bars are not just a quick fix—they’re a little moment of pride in simple ingredients done right. Sometimes, the best recipes come from a handful of honest, straightforward steps that remind us why we cook at all.
In the end, it’s about those small joys—the aroma of toasted almonds, the glossy sheen of melted chocolate, and that satisfying snap when you bite through. Making these chocolate almond bars feels like a quiet celebration of texture and flavor, perfect for whenever you need a thoughtful treat or a little break.

Hi, I’m Ava Bennett. Welcome to Glowing With Pride. I’m Ava Bennett, a professional chef, recipe developer, and lifelong believer that food is one of the most powerful ways we express love, identity, and joy. This space was created from years of working in professional kitchens, countless late nights behind the line, and a deep desire to share food in a way that feels personal, proud, and purposeful. Cooking has never just been my career. It has been my language.


Leave a Reply