This caramel shortbread isn’t just a cookie; it’s a little trip back to childhood afternoons spent sneaking bites of buttery, sweet treats. I love how the caramel layer, when done right, has this chewy, sticky richness that balances perfectly against the crisp, sandy shortbread. It’s a recipe that demands patience, but the payoff is a batch of bites that feel both indulgent and nostalgic, like a secret shared between generations.
What makes this recipe special is the way the caramel develops a deep, complex flavor after a slow simmer—almost like a caramel that’s been sitting in a jar for months, mellow and smoky. It’s one of those recipes where I find myself lingering in the kitchen, watching the golden layer turn shiny and crackly just before pouring it over the shortbread base. It’s a simple comfort that somehow feels like a small act of love in every bite.
Focusing on the nostalgic comfort and surprisingly complex textures that come from mastering the perfect caramel layer, this recipe explores how a simple treat can evoke childhood memories while satisfying grown-up cravings for richness and balance.
The story behind this recipe
- This recipe came from a quiet afternoon rummaging through my grandmother’s old recipe box, where I found a faded card with just a few ingredients and a scribbled note about ‘something sweet and buttery.’ It’s one of those moments where a simple piece of paper sparks a whole new project in your head, reminding you how many treasures are tucked away in forgotten corners of the kitchen.
- I remember the first time I made it, nervously melting the caramel until it shimmered like molten amber, the smell filling the whole house with a warm, buttery aroma. That moment when I poured the caramel over the crisp shortbread and watched it spread—almost like watching a secret unfold—made me realize how much comfort can come from a handful of humble ingredients. It’s a recipe born from a mix of nostalgia, curiosity, and a love for textures that surprise with each bite.
- heading
- story_type
Key ingredients and tips
- Unsalted butter: I use a good, high-fat butter for that rich, nutty flavor that makes the shortbread melt. Swap for salted if you prefer a touch of saltiness, but cut back on added salt later.
- Golden syrup: It’s the secret to that glossy, chewy caramel. If unavailable, light corn syrup works, but expect a slightly different shine and chew.
- Sweetened condensed milk: This is what gives the caramel its smooth, velvety texture. For a dairy-free version, try coconut condensed milk—just note it’ll taste more tropical and coconutty.
- Flour: I stick with plain all-purpose flour for the shortbread’s sandy bite. Almond flour adds nuttiness if you want a richer, slightly denser base—just reduce the butter a touch.
- Dark brown sugar: It brings a deep, molasses-rich sweetness with a hint of smoky caramel. Light brown sugar will work in a pinch, but the flavor won’t be as intense.
- Vanilla extract: The splash of vanilla boosts the caramel’s complexity. Use a high-quality vanilla bean paste if you want those little specks and extra richness.
- Sea salt: A pinch on top of the caramel enhances all the sweet, smoky flavors. If you like a more pronounced saltiness, sprinkle a little extra before baking.
Key Ingredients and Their Quirks
Golden syrup:
- I love its glossy, chewy texture that creates a shiny caramel layer. You can swap with light corn syrup, but expect a slightly different shine and chew.
- Sweetened condensed milk: It’s the velvety backbone of the caramel. Coconut condensed milk works if you’re dairy-free, adding a tropical aroma and a slightly different sweetness.
Dark brown sugar:
- Butter: I use a high-fat, good-quality butter for that rich, nutty flavor. Melts into the shortbread, giving it that tender, crumbly texture. Salted or unsalted—your call, but adjust salt accordingly.
- It brings a deep, molasses richness and smoky undertones. It’s the secret to that caramel’s complex flavor and dark, inviting color.
Notes for ingredient swaps
- Dairy-Free: Swap butter for coconut oil or vegan butter. Expect a slightly different richness and a hint of coconut aroma.
- Gluten-Free: Use a blend of almond flour and gluten-free oats. The shortbread will be a bit more fragile but still tasty.
- Sweetener: Replace golden syrup with honey or maple syrup. The caramel may be slightly less glossy and a touch different in flavor.
- Condensed Milk: Try coconut condensed milk for a dairy-free, tropical twist; it’ll add a subtle coconut flavor to the caramel.
- Sugar: Use coconut sugar or muscovado for a deeper, molasses-like caramel flavor. Expect a darker color and richer taste.
Equipment & Tools
- Oven: To bake the shortbread base evenly.
- Baking pan with parchment: To shape and lift out the shortbread easily.
- Mixing bowls: To combine dry ingredients and prepare the base.
- Heavy-bottom saucepan: To cook the caramel uniformly without scorching.
- Spatula: To spread caramel and smooth the surface.
- Knife or pizza cutter: To cut the cooled, set caramel into pieces.
Step-by-step guide to caramel shortbread
- Preheat your oven to 160°C (320°F). Line a 20cm (8-inch) square baking pan with parchment paper, leaving some overhang for easy removal.
- Make the shortbread base: In a bowl, mix 200g (1 1/2 cups) all-purpose flour, 50g (1/4 cup) caster sugar, and a pinch of salt. Rub in 125g (1/2 cup) cold unsalted butter until the mixture resembles coarse crumbs. Press this mixture evenly into the prepared pan. Bake for 20-25 minutes or until lightly golden around the edges. Set aside to cool slightly.
- Prepare the caramel: In a heavy saucepan, combine 150g (3/4 cup) golden syrup, 397g (14 oz) sweetened condensed milk, and 50g (1/4 cup) unsalted butter. Cook over medium-low heat, stirring constantly, until the mixture thickens and turns a deep amber, about 10-15 minutes. The caramel should be smooth and glossy. If it begins to smoke or stick to the bottom, lower the heat immediately.
- Pour the hot caramel over the warm shortbread base, spreading evenly with a spatula. Tap the pan gently on the counter to settle the caramel and remove any air bubbles. Let cool at room temperature for about 30 minutes, then transfer to the fridge for at least 2 hours or until set.
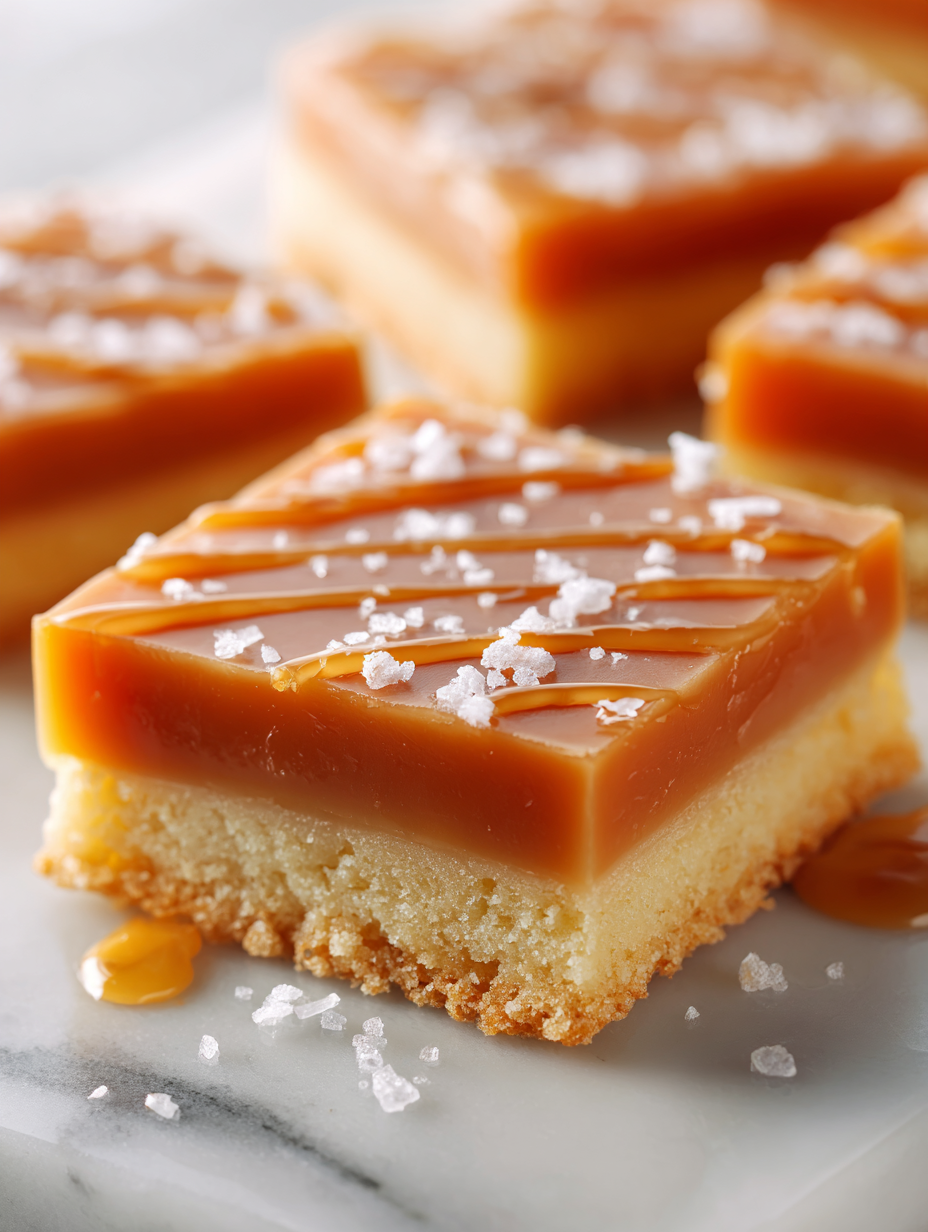
- Finish with toppings: Once the caramel is firm, cut into squares or rectangles. For a decorative touch, sprinkle with sea salt or drizzle with melted chocolate. Allow to set for another 15 minutes before serving.
Allow the caramel to cool completely in the fridge for at least 2 hours, or until firm. Slice carefully with a sharp knife, and finish with a sprinkle of sea salt or a drizzle of chocolate if desired. Serve at room temperature for best flavor and texture.
How to Know It’s Done
- Caramel is shiny and holds its shape when poured.
- Shortbread base is golden and crumbly, not soggy or pale.
- Caramel layer cracks slightly when cut, indicating it’s set properly.
Caramel Shortbread
Ingredients
Equipment
Method
- Preheat your oven to 160°C (320°F). Line a square baking pan with parchment paper, leaving overhang for easy removal.
- In a mixing bowl, combine the flour, caster sugar, and a pinch of salt. Use your fingertips to rub in the cold butter until the mixture resembles coarse crumbs—this gives the shortbread its tender, sandy texture.
- Press this crumbly mixture evenly into the prepared pan, smoothing the surface with the back of a spoon. Bake for 20-25 minutes, until lightly golden around the edges and fragrant.
- While the shortbread bakes, make the caramel: In a heavy-bottom saucepan, stir together golden syrup, sweetened condensed milk, and butter. Place over medium-low heat, stirring constantly, until the mixture thickens, deepens in color, and turns a rich amber—about 10-15 minutes.
- Remove the baked shortbread from the oven and let it cool slightly in the pan. Once warm, pour the hot caramel evenly over the shortbread, spreading gently with a spatula to cover the surface completely.
- Allow the caramel to cool at room temperature for about 30 minutes, then transfer the pan to the fridge. Chill for at least 2 hours until the caramel is firm and set.
- Using the parchment overhang, lift the set caramel shortbread from the pan. Place on a cutting board and cut into squares or rectangles with a sharp knife.
- If desired, sprinkle a pinch of sea salt on top of the caramel for a flavor boost. Serve at room temperature for the perfect balance of chewy caramel and crumbly shortbread.
Tips for Perfect Caramel Shortbread
- Use a heavy-bottomed saucepan to prevent scorching and promote even caramelization.
- Stir constantly when cooking caramel to avoid burning and achieve a smooth, glossy finish.
- Pour caramel over the shortbread while still warm for an even, gooey layer that sets perfectly.
- Chill the assembled shortbread thoroughly—at least 2 hours in the fridge—for clean, sharp cuts.
- Use a sharp knife warmed slightly under hot water to cut through the firm caramel without cracking.
Common mistakes and how to fix them
- FORGOT to watch caramel during simmering → Stir constantly to prevent burning and ensure even color.
- DUMPED caramel on hot shortbread → Let caramel cool slightly before pouring for a smoother layer.
- OVER-TORCHED caramel layer → Remove from heat immediately if it smokes or turns too dark.
- MISSED adding salt on top → Sprinkle sea salt just before setting for enhanced flavor contrast.
Quick Fixes and Pantry Swaps
- When caramel is too thick, splash in a teaspoon of hot water to loosen it quickly.
- If caramel cracks when pouring, gently reheat it until smooth and shiny again.
- Dumped caramel too runny? Chill it for 10 minutes to thicken before spreading.
- Over-torched caramel? Shield with a layer of melted chocolate for added flavor and moisture.
- Splash a little lemon juice in caramel if it becomes too thick or gloopy; brightens flavor instantly.
Prep, store, and reheat tips
- Prepare the shortbread base and bake it a day in advance; once cooled, store in an airtight container at room temperature for up to 2 days, keeping it crisp but not stale.
- Make the caramel layer up to 24 hours ahead; once cooled and set, cover with plastic wrap and keep at room temperature to maintain its chewy texture.
- For the best texture, assemble and refrigerate the fully finished shortbread for up to 3 days; bring to room temp before serving to enhance flavor and soften slightly.
- Reheat slices briefly in a low oven (around 150°C/300°F) for 5 minutes until the caramel warms and shimmers, restoring a gooey, luscious bite, but avoid melting the shortbread.
Top questions about caramel shortbread
1. Can I freeze caramel shortbread?
Yes, you can freeze caramel shortbread. Wrap it tightly in plastic, then foil, and store for up to 3 months. Thaw at room temperature before serving for best texture.
2. Why isn’t my caramel thickening?
If the caramel isn’t thickening, increase the heat slightly and stir constantly, but watch carefully to avoid burning the caramel.
3. How do I get clean slices?
Use a sharp knife warmed under hot water for cleaner cuts. Wipe it dry before slicing to prevent sticking.
4. Why does my caramel crack when I cut it?
If the caramel layer cracks when you cut, reheat it gently until it becomes slightly softer and more pliable.
5. How long should I chill the finished shortbread?
Always chill the assembled shortbread at least 2 hours to ensure the caramel is firm and slices hold well.
6. Can I add salt on top?
For a richer flavor, add a pinch of sea salt on top before the caramel sets, enhancing the sweetness and depth.
7. Should I use salted or unsalted butter?
Use unsalted butter for control over saltiness, but salted butter can be used if you reduce added salt in the recipe.
8. Can I substitute golden syrup?
Golden syrup gives the caramel its shine and chewy texture. Substitute with light corn syrup, but expect slight changes in gloss and chewiness.
9. What color should the caramel be?
Make sure to cook the caramel until it turns a deep amber, not too dark, to avoid a burnt flavor.
10. What if my caramel is too runny?
If your caramel is too runny, chill it for 10 minutes to help it firm up before pouring over the shortbread.
This caramel shortbread isn’t just about the sweet, buttery layers; it’s about those moments of quiet satisfaction when the caramel cracks just right and the aroma fills the room. It’s a recipe that feels like a small, deliberate act of kindness, especially now when we’re craving comfort that’s both simple and rich.
Sharing this feels like passing along a secret—something familiar yet special. I find myself returning to it, year after year, because it reminds me that sometimes the best treats come from humble ingredients and a little patience in the kitchen.

Hi, I’m Ava Bennett. Welcome to Glowing With Pride. I’m Ava Bennett, a professional chef, recipe developer, and lifelong believer that food is one of the most powerful ways we express love, identity, and joy. This space was created from years of working in professional kitchens, countless late nights behind the line, and a deep desire to share food in a way that feels personal, proud, and purposeful. Cooking has never just been my career. It has been my language.


Leave a Reply