Making peanut butter bars is like a quick trip back to childhood kitchens, where the smell of melting butter and peanut butter was a promise of something sweet and satisfying. It’s a recipe rooted in simplicity but packed with nostalgia, reminding us of school lunches and lazy weekends. There’s something honest about the way these bars come together—no fuss, just good ingredients and a little bit of patience.
Every time I make them, I get a little hit of relief, like pressing pause on a busy day. The process is almost meditative: melting, mixing, pressing into a pan—and then, the wait, which is always worth it. These bars aren’t just dessert; they’re a small ritual, a way to reconnect with those warm, uncomplicated moments.
In a world that’s constantly rushing, these peanut butter bars are a reminder that comfort lies in the familiar, in the act of creating something from scratch that tastes like home. They’re perfect for sharing, for snacking, or just for sinking into a quiet moment of sweetness.
Focusing on the nostalgic comfort and childhood memories that come flooding back when making peanut butter bars, highlighting how the simple act of mixing, pressing, and slicing can evoke a sense of home and simpler times.
The story behind this recipe
- Making peanut butter bars takes me back to lazy weekend afternoons in my grandmother’s kitchen. She’d always have a batch ready, the smell of toasted oats and melting peanut butter filling the house with a cozy, familiar warmth. It’s one of those recipes I inherited without really realizing it—just a handful of ingredients, a little patience, and suddenly, there’s this perfect little square of childhood in my hands.
- The thing is, these bars are more than just a treat. They’re a quiet nod to simpler times, where the biggest decision was whether to have seconds or thirds. When I make them now, I feel a tiny spark of that same carefree joy, a reminder that comfort food doesn’t have to be complicated.
- heading
- story_type
Ingredient breakdown: key components
- Creamy peanut butter: I prefer a natural, unsweetened variety that’s rich and slightly oily—makes the bars extra gooey. Feel free to swap for almond or sunflower seed butter if peanut allergies are involved.
- Butter: I use unsalted, but a little salted butter can add a subtle depth. Melt it gently to avoid browning; you want it smooth and fragrant, not nutty or smoky.
- Oats: Old-fashioned rolled oats give the best texture—chewy with a slight nutty aroma. For a softer bite, try quick oats, but avoid instant varieties that turn mushy.
- Honey or corn syrup: This keeps the bars chewy and adds a touch of sweetness. If you’re out, maple syrup or agave can work, but expect a slightly different flavor profile.
- Chocolate chips: I love semi-sweet for balance, but milk or dark chips are fine. Add them while the mixture’s warm so they melt just enough for a shiny, tempting finish.
- Vanilla extract: A splash enhances all the flavors and adds a warm aroma. Skip it if you want a more straightforward peanut-butter punch, but I find it rounds everything out.
- Salt: A pinch brings out the richness of the peanut butter. Adjust based on your butter—if it’s salted, skip extra salt in the recipe.
Spotlight on key ingredients
Honey or corn syrup: This keeps the bars chewy and adds a touch of sweetness. If you’re out, maple syrup or agave can work, but expect a slightly different flavor profile.:
- Creamy peanut butter: I prefer a natural, unsweetened variety that’s rich and slightly oily—makes the bars extra gooey. Feel free to swap for almond or sunflower seed butter if peanut allergies are involved.
- Butter: I use unsalted, but a little salted butter can add a subtle depth. Melt it gently to avoid browning; you want it smooth and fragrant, not nutty or smoky.
- Oats: Old-fashioned rolled oats give the best texture—chewy with a slight nutty aroma. For a softer bite, try quick oats, but avoid instant varieties that turn mushy.
Notes for ingredient swaps
- Dairy-Free: Coconut oil or vegan butter can replace butter, but expect a slightly different richness and texture.
- Natural Sweetener: Maple syrup or agave can substitute honey, adding a different depth of flavor and slightly thinner consistency.
- Nut Butter: Almond or cashew butter work well, though they may alter the final flavor and slightly change the gooeyness.
- Oats: Quinoa flakes or toasted rice cereal can replace oats for a different crunch or softer bite.
- Chocolate Chips: Carob chips or chopped dried fruit can replace chocolate for a different sweetness and texture.
- Salt: A pinch of flaky sea salt on top enhances flavors, but skip if your butter or peanut butter is salted already.
- Add-ins: Chopped nuts, dried fruit, or seeds can be stirred in for extra texture and flavor variation.
Equipment & Tools
- 20cm (8-inch) square baking pan: Holds the mixture as it sets and makes slicing easier.
- Saucepan: Melts butter and peanut butter gently on low heat.
- Spatula: Stirs ingredients and presses mixture into the pan.
- Parchment paper: Prevents sticking and aids in removing the set bars.
- Sharp knife: Slices the cooled, firm bars into neat squares.
Step-by-step guide to peanut butter bars
- Gather your equipment: 20cm (8-inch) square baking pan, saucepan, spatula, parchment paper, and a sharp knife. Line the pan with parchment for easy removal.
- In the saucepan, melt 1/2 cup (113g) unsalted butter over low heat—just until it’s melted and fragrant, about 2 minutes. Keep an eye on it so it doesn’t brown.
- Add 1 cup (240g) creamy peanut butter to the melted butter. Stir constantly until smooth and shiny, about 1-2 minutes. Smell that warm, nutty aroma—perfection.
- Stir in 1/2 cup (120ml) honey or corn syrup. Mix until fully incorporated, about 1 minute. The mixture should be smooth and oozy.
- Remove from heat. Quickly fold in 2 cups (150g) rolled oats and 1 teaspoon vanilla extract. Mix well until evenly coated and sticky.
- Pour the mixture into your prepared pan. Use a spatula to press it evenly into the corners and flatten the top. The mixture should be dense and compact.
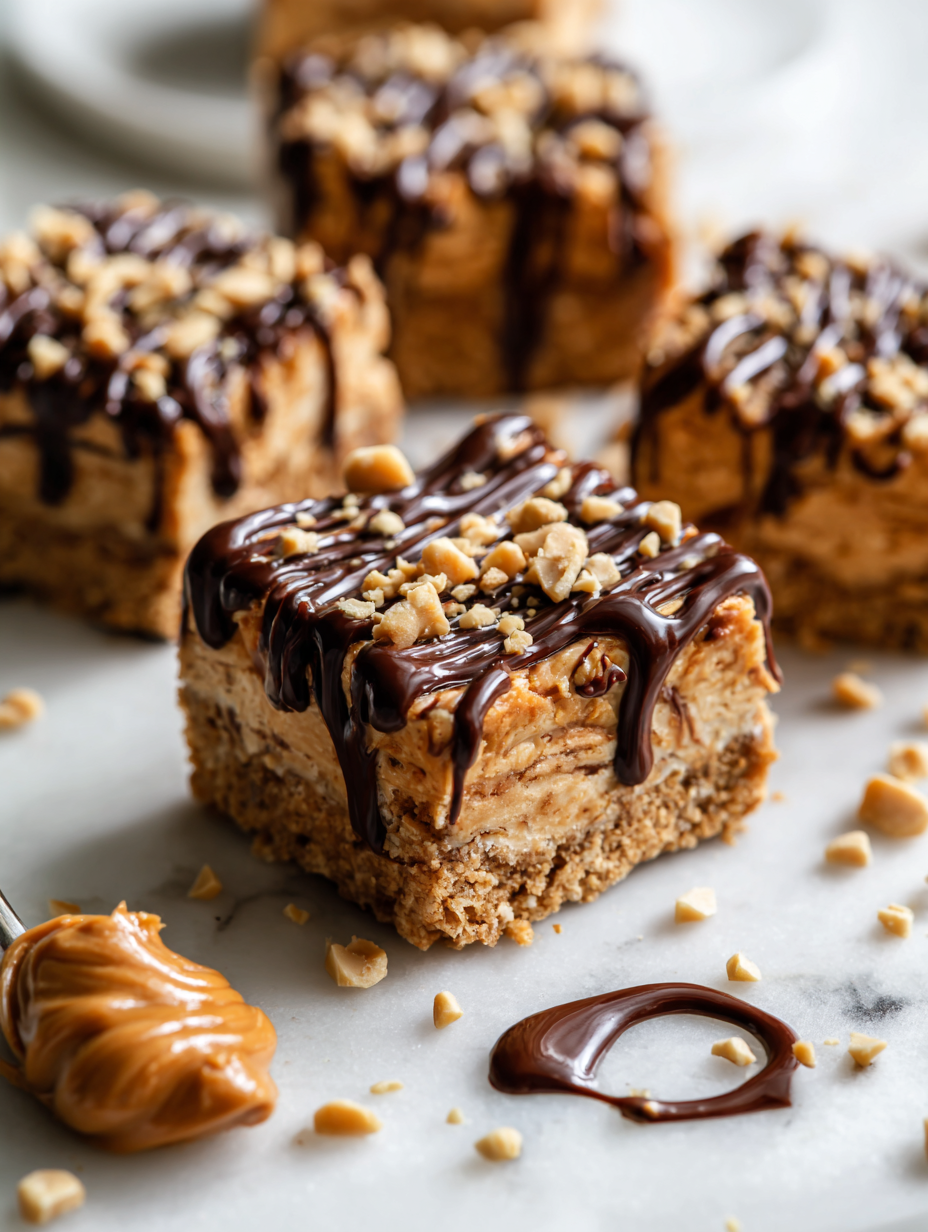
- Sprinkle 1/2 cup (90g) chocolate chips on top while still warm. Gently press them into the surface to help them melt slightly and stick.
- Let the bars cool at room temperature for about 30 minutes, then transfer to the fridge. Chill for at least 2 hours or until firm.
- Once set, use the parchment overhang to lift the bars out of the pan. Slice into squares with a sharp knife, wiping the blade between cuts for clean edges.
- Serve immediately or store in an airtight container. For best texture, keep refrigerated and bring to room temp before serving—smells of peanut butter and chocolate will be irresistible.
Allow the bars to cool completely at room temperature, then chill in the fridge for at least 2 hours. Slice into squares and serve or store in an airtight container in the fridge for up to a week. For softer texture, let sit at room temperature for 10 minutes before serving.
How to Know It’s Done
- Mixture is glossy and well combined before pressing.
- Chocolate chips are melted into the surface, not just sitting on top.
- Bars are firm and hold shape after chilling, with a slight chew when bitten.
Peanut Butter Bars
Ingredients
Equipment
Method
- Line your baking pan with parchment paper and set it aside. Melt the butter in a saucepan over low heat until just fragrant and smooth, about 2 minutes.
- Add the creamy peanut butter to the melted butter and stir until the mixture is glossy and well combined, about 1-2 minutes. The aroma should be warm and nutty.
- Pour in the honey or corn syrup and stir until fully incorporated, resulting in a sticky, smooth mixture.
- Remove the saucepan from heat. Fold in the rolled oats and vanilla extract, mixing thoroughly until the oats are evenly coated and the mixture is thick and sticky.
- Transfer the mixture into the prepared pan. Use a spatula to press it firmly into an even layer, ensuring it’s densely packed and smooth on top.
- Sprinkle the chocolate chips evenly over the warm mixture, pressing them gently into the surface to help them melt slightly and stick.
- Allow the bars to cool at room temperature for about 30 minutes, then transfer the pan to the fridge and chill for at least 2 hours until they are firm and set.
- Once chilled, lift the bars out of the pan using the parchment paper overhang. Use a sharp knife to slice into neat squares, wiping the blade between cuts for clean edges.
- Serve immediately or store in an airtight container in the refrigerator for up to a week. For softer bites, let the bars sit at room temperature for 10 minutes before enjoying.
Pro tips for perfect peanut butter bars
- Use room temperature peanut butter to ensure it mixes smoothly without clumping.
- Gently toast the oats beforehand for a nuttier flavor and crunchier texture.
- Melt butter and peanut butter slowly over low heat to prevent scorching and preserve aroma.
- Press mixture firmly into the pan for even thickness and easier slicing later.
- Sprinkle chocolate chips on warm mixture to encourage melting and a shiny finish.
- Chill the bars thoroughly, at least 2 hours, for clean cuts and perfect texture.
- Wipe your knife with a damp cloth between slices to avoid sticking and jagged edges.
Common mistakes and how to fix them
- FORGOT to preheat oven? Always start with a warm pan for even melting.
- DUMPED too much salt? Use less or skip if your peanut butter is already salted.
- OVER-TORCHED chocolate? Lower heat and stir constantly to prevent burning.
- MISSED the chilling step? Always refrigerate until bars are firm for clean slicing.
Quick fixes and pantry swaps
- If mixture is too thick, splash in a teaspoon of hot water and stir gently.
- When chocolate isn’t melting smoothly, patch with a quick microwave zap at 10 seconds.
- Dumped too much salt? Shield with extra peanut butter to balance flavors.
- Over-torched chocolate? Rescue with a teaspoon of coconut oil stirred in.
- When bars stick to the pan, swap parchment for greased foil for easier removal.
Prep, store, and reheat tips
- Preparing the mixture the day before allows the flavors to meld and the texture to firm up, making slicing easier and cleaner.
- Store the fully cooled bars in an airtight container in the fridge for up to a week; the cool environment keeps them firm and prevents melting.
- For longer storage, wrap the bars individually in plastic wrap and freeze for up to a month. Thaw at room temperature for 10 minutes before serving.
- Reheat refrigerated bars briefly in the microwave—about 10 seconds—to soften slightly and enhance the peanut butter aroma, but avoid overheating which can make them greasy.
Top questions about peanut butter bars
1. Can I use chunky peanut butter?
Choose creamy peanut butter for extra gooeyness and smooth texture, which helps the bars hold together well.
2. Can I make these bars gluten-free?
Yes, but the texture will be chunkier, and you’ll get little peanut pieces in each bite, which some love.
3. Are these bars suitable for gluten-free diets?
Absolutely, just swap out the oats for gluten-free rolled oats or rice cereal for a similar crunch.
4. How long do peanut butter bars stay fresh?
Refrigerate the bars in an airtight container for up to a week, and let them sit at room temp for softer bites before serving.
5. Can I serve these straight from the fridge?
If you want softer bars, let them sit at room temperature for 10-15 minutes before slicing or eating.
6. Should I warm the bars before eating?
Yes, but they might be a little firmer. Warming them slightly makes the peanut butter aroma more intense and the texture softer.
7. Can I add other mix-ins?
Yes, you can add chocolate chips, but be sure to press them gently into the warm mixture so they melt slightly for a glossy finish.
8. My mixture is too stiff—what do I do?
If the mixture is too thick to press into the pan, stir in a teaspoon of hot water to loosen it up slightly.
9. My chocolate is burnt—how do I fix it?
Over-torched chocolate can be rescued by adding a teaspoon of coconut oil and stirring until smooth.
10. Can I freeze peanut butter bars?
Yes, freezing these bars in an airtight container for up to a month works well. Let them thaw at room temperature for best texture.
These peanut butter bars carry a quiet magic, tying me back to childhood and simpler days. Every bite feels like a small act of nostalgia, rich with flavor and memory. They’re not just a treat—they’re a brief escape into familiar comfort.
In a busy world, sometimes it’s the familiar, imperfect moments that matter most. Making these bars is a simple ritual that reconnects me with warmth and home, one square at a time. And honestly, I wouldn’t have it any other way.

Hi, I’m Ava Bennett. Welcome to Glowing With Pride. I’m Ava Bennett, a professional chef, recipe developer, and lifelong believer that food is one of the most powerful ways we express love, identity, and joy. This space was created from years of working in professional kitchens, countless late nights behind the line, and a deep desire to share food in a way that feels personal, proud, and purposeful. Cooking has never just been my career. It has been my language.


Leave a Reply