Getting the perfect cheesecake bars isn’t about luck; it’s about understanding the balance between a creamy, rich filling and a crisp, golden crust. I’ve made plenty of versions that cracked, sank, or lost their texture when hurried, but over time, I found small tweaks that make all the difference, even on busy days. This recipe is my honest attempt to share those tricks so you can get it right without fuss, every single time.
What I love most about these cheesecake bars is how forgiving they are once you know the basics. They’re great for when friends drop in unexpectedly or when you want to bake something sweet but don’t want to fuss with a full cheesecake. The key is in the gentle baking and cool-down process, which keeps cracks at bay and preserves that silky, smooth bite I crave.
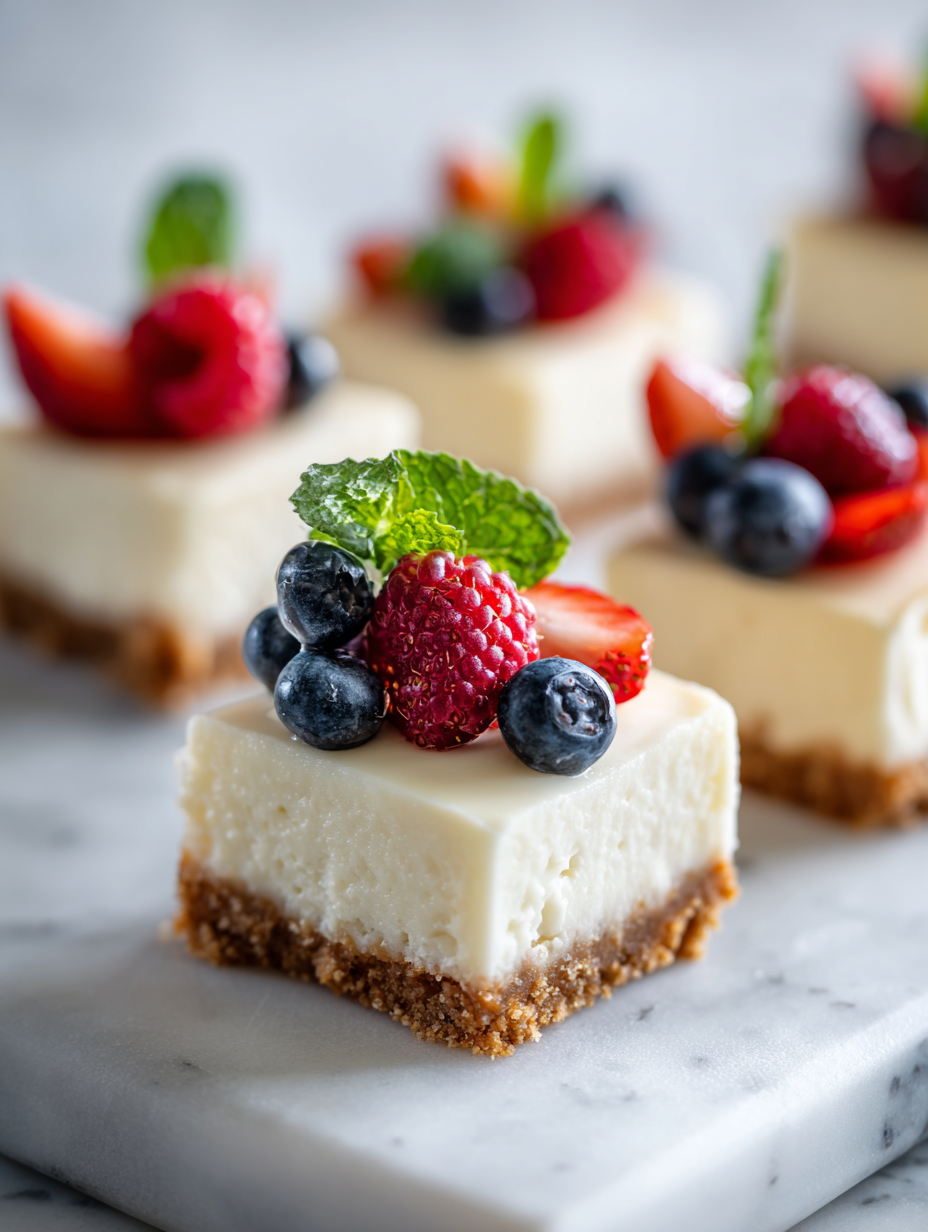
Focusing on how to achieve the perfect balance between creamy filling and crisp crust in cheesecake bars, this recipe emphasizes techniques to prevent cracking and ensure each bite is a harmonious mix of textures, even when rushed or made in a hurry.
The story behind this recipe
- I first stumbled upon this idea when I was rushing to make a dessert for a last-minute get-together. The store-bought cheesecakes were too heavy and overly sweet, so I decided to whip up something quick but satisfying. The first batch I made was a total mess—cracks, runny filling, you name it. But I kept tinkering, focusing on the balance of ingredients and gentle baking, until I hit on this method. Now, these bars have become a staple for both busy weekdays and casual parties.
- What I love about this recipe is how forgiving it is, even if you’re pressed for time. It’s a reminder that good things can happen with a little patience and a splash of improvisation. Plus, the smell of melting butter and cream cheese filling filling the kitchen—nothing beats that cozy, inviting aroma. It’s comfort in a pan, simple but deeply satisfying.
- heading:
Ingredient breakdown: key components
- Cream cheese: I love the tangy richness it adds, but softening it thoroughly makes mixing a breeze—no lumps, just silky smoothness. If it’s still cold, give it a few minutes at room temp.
- Graham cracker crumbs: They give that perfect crunch, but I often toast them lightly before mixing to boost flavor and add a subtle smoky note—think of it as a toasted-sugar aroma wafting through your crust.
- Butter: I prefer melted, unsalted butter for the crust—just enough to bind everything together without greasing the pan. If you want a richer crust, try a splash of browned butter for nutty depth.
- Sugar: I use granulated, but a touch of brown sugar can add a caramel undertone that pairs beautifully with the tang of the cheese. Adjust depending on your sweetness preference.
- Eggs: They help set the filling, making it slice neatly. I always crack them into a separate bowl first—less risk of shells ending up in your silky mix. No overbeating; just combine until smooth.
- Lemon zest: Just a touch brightens the whole cheesecake with a fresh, citrusy glow. Use a microplane for the finest zest—don’t skip this, it’s the secret spark.
- Vanilla extract: A splash of good vanilla pulls all the flavors together. I prefer real vanilla bean paste for a deeper aroma, but pure extract works just fine—just don’t skimp.
Spotlight on key ingredients
Cream cheese:
- I love the tangy richness it adds, but softening it thoroughly makes mixing a breeze—no lumps, just silky smoothness. If it’s still cold, give it a few minutes at room temp.
- Graham cracker crumbs: They give that perfect crunch, but I often toast them lightly before mixing to boost flavor and add a subtle smoky note—think of it as a toasted-sugar aroma wafting through your crust.
- Butter: I prefer melted, unsalted butter for the crust—just enough to bind everything together without greasing the pan. If you want a richer crust, try a splash of browned butter for nutty depth.
Graham cracker crumbs:
- Cream cheese: I love the tangy richness it adds, but softening it thoroughly makes mixing a breeze—no lumps, just silky smoothness. If it’s still cold, give it a few minutes at room temp.
- They give that perfect crunch, but I often toast them lightly before mixing to boost flavor and add a subtle smoky note—think of it as a toasted-sugar aroma wafting through your crust.
- Butter: I prefer melted, unsalted butter for the crust—just enough to bind everything together without greasing the pan. If you want a richer crust, try a splash of browned butter for nutty depth.
Notes for ingredient swaps
- Dairy-Free: Use coconut cream or cashew-based cream cheese. Expect a slightly different tang and creaminess, but still rich.
- Gluten-Free: Replace graham cracker crumbs with crushed gluten-free cookies or toasted oats. Keeps that satisfying crunch with a different flavor note.
- Sugar Alternatives: Swap granulated sugar for honey, maple syrup, or coconut sugar. Adjust quantity—less sweet, more caramel undertone.
- Lemon Zest: Use lime or orange zest for a citrus twist. Adds a different bright, fragrant note that still lifts the cheesecake.
- Butter: Try melted coconut oil or margarine for dairy-free options. Watch for slight flavor changes and a different richness.
- Eggs: Substitute with flax eggs or applesauce for vegan versions. Texture may be a tad denser but still pleasant.
- Flavor Boosts: Add a splash of bourbon or vanilla bean paste for deeper aroma and complexity. Just a tiny splash makes a big difference.
Equipment & Tools
- 9-inch square baking pan: Holds the crust and filling, provides the right size for even baking.
- Parchment paper: Prevents sticking and makes removal easy.
- Mixing bowls: Combine ingredients smoothly and efficiently.
- Hand mixer: Creams the cheese and blends the filling easily.
- Rubber spatula: Smooths the batter and presses the crust.
- Cooling rack: Allows the crust to cool evenly and prevents sogginess.
- Sharp knife: Cuts clean slices without squishing the bars.
Step-by-step guide to cheesecake bars
- Preheat your oven to 160°C (320°F). Line a 9-inch square baking pan with parchment paper, leaving an overhang for easy removal.
- Mix the graham cracker crumbs, sugar, and a pinch of salt in a bowl. Melt the butter and stir it into the crumbs until evenly coated.
- Press the crumb mixture firmly into the bottom of the prepared pan to form an even crust. Bake for 10 minutes until golden and fragrant. Cool slightly on a wire rack.
- While the crust cools, beat softened cream cheese with sugar until smooth and creamy, about 2-3 minutes. Use a hand mixer on medium speed.
- Add eggs one at a time, mixing just until combined. Then stir in vanilla and lemon zest. The batter should be silky and smooth, no lumps.
- Pour the filling over the cooled crust, smoothing the top with a spatula. Tap the pan gently on the counter to remove air bubbles.
- Bake at 160°C (320°F) for 25-30 minutes. The edges should be set but the center slightly jiggly. It will firm up as it cools.
- Turn off the oven, crack the door open, and let the bars cool inside for 30 minutes. This gentle cooling helps prevent cracks.
- Remove from oven, and let cool completely at room temperature. Then refrigerate uncovered for at least 4 hours, preferably overnight.
- For serving, lift the cheesecake out using the parchment overhang. Slice into squares with a sharp knife, wiping between cuts for clean edges.
- Finish with a dusting of powdered sugar or fresh berries if desired. Serve chilled for the best creamy texture.
Let the bars cool completely on a wire rack, then refrigerate uncovered for at least 4 hours or overnight. Slice with a sharp knife, wiping blade between cuts. Serve chilled, optionally dusted with powdered sugar or topped with berries.
How to Know It’s Done
- Crust is golden and fragrant after initial bake.
- Filling is silky, no lumps, and slightly puffed at edges after baking.
- Center jiggles slightly but is mostly set, with a light crackle on top.
Cheesecake Bars
Ingredients
Equipment
Method
- Line the bottom of a 9-inch square baking pan with parchment paper, leaving overhang for easy removal.
- In a bowl, combine the graham cracker crumbs, sugar, and a pinch of salt. Pour in the melted butter and stir until the mixture is evenly coated and resembles wet sand.
- Press this crumb mixture firmly into the prepared pan, spreading evenly across the bottom. Use the back of a spoon or a spatula to smooth the surface, then bake at 160°C (320°F) for 10 minutes until fragrant and slightly golden. Cool on a wire rack.
- While the crust cools, beat the softened cream cheese with a hand mixer until silky and smooth, about 2-3 minutes. Add the sugar and continue mixing until combined and fluffy.
- One at a time, add eggs to the cream cheese mixture, beating on low speed after each addition just until incorporated. Then stir in vanilla extract and lemon zest for a fresh, fragrant flavor.
- Pour the creamy filling over the cooled crust, smoothing the top with a spatula. Gently tap the pan on the counter to release any air bubbles and ensure an even surface.
- Bake at 160°C (320°F) for 25-30 minutes until the edges are set but the center still jiggles slightly. This gentle baking prevents cracks and keeps the texture smooth.
- Turn off the oven, crack the door open, and let the cheesecake cool inside for 30 minutes to prevent cracking from sudden temperature changes.
- Remove the pan from the oven and cool completely at room temperature. Then refrigerate uncovered for at least 4 hours or overnight to set fully.
- Using the parchment overhang, lift the cheesecake out of the pan and place it on a cutting board. Slice into squares with a sharp knife, wiping the blade between cuts for clean edges.
- Serve the bars chilled, optionally dusted with powdered sugar or topped with fresh berries for extra flair. Enjoy the smooth, creamy texture with a crisp crust in every bite!
Tips for Perfect Cheesecake Bars
- Bolded mini-head: Use room temperature ingredients for a smoother, creamier filling—cold cheese can cause lumps.
- Bolded mini-head: Lightly toast the graham cracker crumbs before mixing to enhance flavor and add a subtle smoky aroma.
- Bolded mini-head: Press the crust firmly into the pan for an even base; a gentle tap helps set it without cracks.
- Bolded mini-head: Bake the crust until golden and fragrant, then cool slightly to prevent sogginess in the filling.
- Bolded mini-head: Pour the filling gently over the crust and tap the pan to remove air bubbles for a smooth top.
- Bolded mini-head: Bake until the edges are set but the center jiggles slightly—residual heat will firm it up as it cools.
- Bolded mini-head: Cool the bars completely at room temperature, then refrigerate uncovered for at least 4 hours for best texture.
Common Cheesecake Bar Mistakes & Fixes
- FORGOT to pre-bake crust → Always blind bake to prevent sogginess.
- DUMPED in cold eggs → Warm eggs slightly for better blending and no lumps.
- OVER-TORCHED crust → Cover with foil if edges darken too fast.
- MISSED cooling step → Cool completely to avoid cracks and ensure firmness.
Quick fixes and pantry swaps
- When batter is too runny, splash in a bit more crushed cookies for firmness.
- If crust crumbles, patch with a light spritz of water and press again.
- Splash a teaspoon of lemon juice if filling is too dense or dulls the tang.
- Shield edges with foil if they brown too fast during baking.
- Dumped in cold cream cheese? Rescue by softening it at room temp before mixing again.
Prep, store, and reheat tips
- You can prepare the crust and press it into the pan a day before, then keep it covered at room temperature to stay crisp.
- The cheesecake filling can be made a day in advance; keep it refrigerated in an airtight container. It thickens slightly but remains creamy.
- Store the baked bars in an airtight container in the fridge for up to 3 days. The flavors deepen slightly, and the texture stays smooth.
- Reheat slices gently in the microwave for about 10 seconds—just until slightly warm and the aroma of cream cheese becomes inviting again.
- For longer storage, freeze the bars wrapped tightly in plastic wrap and then foil for up to a month. Thaw in the fridge overnight before serving.
Top questions about cheesecake bars
1. Can I use low-fat cream cheese?
Use full-fat cream cheese for richness and a silky texture. Light or reduced-fat cheese won’t set as well.
2. How do I know when the cheesecake bars are done?
Bake until the edges are golden and the center jiggles slightly, about 25-30 minutes at 160°C (320°F).
3. Should I refrigerate the bars immediately after baking?
Let them cool completely at room temperature, then refrigerate uncovered for at least 4 hours or overnight for best texture.
4. Can I substitute the graham cracker crumbs?
Use crushed graham crackers that are finely ground for a smooth, cohesive crust that holds together well.
5. Why do my cheesecake bars crack?
If the filling cracks during baking, try lowering the oven temperature slightly and cooling gradually to prevent sudden temperature changes.
6. How should I store leftovers?
Wrap leftover bars tightly in plastic and store in the fridge for up to 3 days, or freeze for longer storage.
7. Can I add other flavors like fruit or chocolate?
Add a splash of lemon juice or zest to brighten the flavor and add a fresh, tangy note to each bite.
8. How do I get clean slices?
Use a sharp knife, wiping the blade between cuts, for clean, neat slices without squishing the edges.
9. Can I reheat the cheesecake bars?
Reheat slices gently in the microwave for about 10 seconds to bring back the creamy, warm texture.
10. Can I make the crust gluten-free or vegan?
Yes, you can swap graham crackers for digestive biscuits or toasted oats for a different flavor and texture.
Making these cheesecake bars is a messy kind of joy—cracks, yes, but also that sweet, creamy scent filling your kitchen. They remind me that sometimes simplicity, with just the right touch of care, makes the most satisfying desserts. No matter the chaos, biting into that smooth, tangy slice feels like a quiet victory.
In a world that moves fast, these bars offer a moment of calm and comfort. They’re not about perfection, but about enjoying the process and the reward of a homemade treat. Honestly, once you get the hang of it, they become a go-to for both busy weeknights and lazy weekends.

Hi, I’m Ava Bennett. Welcome to Glowing With Pride. I’m Ava Bennett, a professional chef, recipe developer, and lifelong believer that food is one of the most powerful ways we express love, identity, and joy. This space was created from years of working in professional kitchens, countless late nights behind the line, and a deep desire to share food in a way that feels personal, proud, and purposeful. Cooking has never just been my career. It has been my language.


Leave a Reply