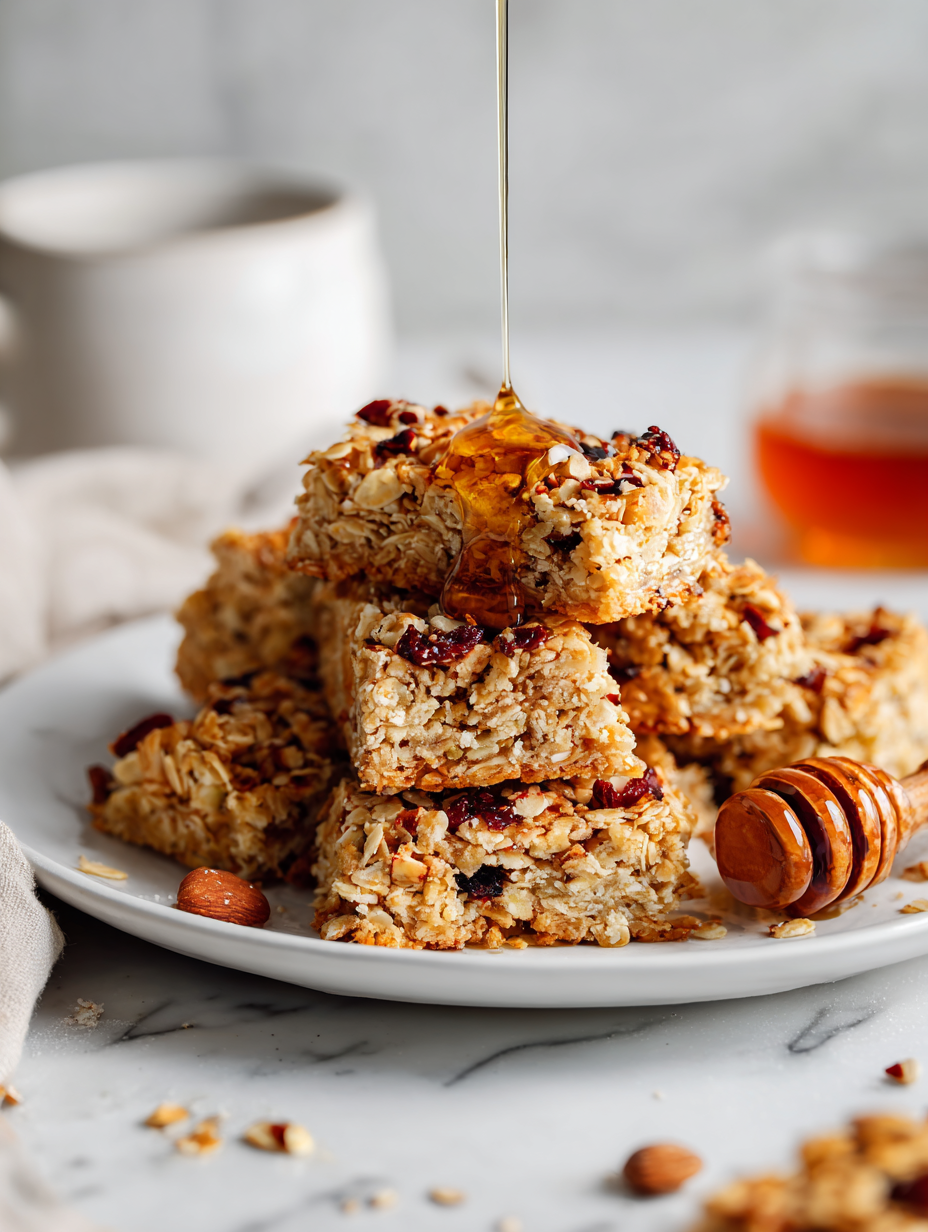
Making oatmeal bars feels like capturing a piece of childhood, those mornings when the kitchen smelled of sweet oats and melting butter. But lately, I’ve been tinkering with them—adding toasted coconut or a pinch of sea salt—to turn a familiar comfort into something a bit more special. It’s a simple, honest bake that’s perfect for lazy weekends or grabbing on the go.
What I love about these bars is how forgiving they are; they come together with pantry staples and bake up with a chewy, crunchy texture that keeps everyone coming back for more. There’s a nostalgia in every bite, but also a little twist of something unexpected—like a splash of vanilla or a handful of chopped nuts—that makes them feel like a treat you didn’t see coming. They’re honest, unpolished, and just right for those mornings when you need a little comfort.
Focusing on making oatmeal bars that are not just a snack but a nostalgic comfort, reminiscent of childhood mornings, yet elevated with unexpected ingredients like toasted coconut or a hint of sea salt. This recipe is about transforming simple pantry staples into a treat that balances crunch, chewiness, and a touch of sweetness, perfect for lazy weekends or quick bites.
The story behind this recipe
- This recipe came together after a lazy Sunday morning, when I realized I was out of my usual quick snacks. I wanted something that felt familiar but had a little twist—like adding a handful of toasted coconut I had leftover from another bake. The smell of oats and caramelizing butter filling the kitchen made me think of childhood mornings, but with a grown-up edge.
- I’ve been baking these bars for years, tweaking the ingredients here and there—sometimes with chocolate chips, sometimes with dried fruit. There’s a comfort in how forgiving the process is, and how versatile the ingredients can be. They’re a staple in my house now, perfect for those times when you need a quick, honest treat that hits just right.
- heading
- The story behind this recipe
Key ingredients and tips
- Old-fashioned rolled oats: I love the chewiness they bring, and toasting them slightly enhances their nutty aroma. Skip this for a softer, less toasty flavor.
- Brown sugar: It adds a deep caramel note and moistness; if you prefer a less sweet bar, cut back a bit or substitute with coconut sugar for a subtler taste.
- Butter: The richness makes the bars melt-in-your-mouth; try salted butter for a hint of savory contrast or margarine if dairy-free is needed.
- Honey or maple syrup: These bind the ingredients and add a gentle sweetness—use honey for a richer, floral note, or pure maple for a smoky undertone.
- Coconut flakes: Toasted until golden, their shatter and aroma add a nostalgic crunch; omit or swap with chopped nuts for different texture and flavor.
- Vanilla extract: Just a splash lifts the whole thing with warmth; if you don’t have vanilla, a pinch of cinnamon can add a cozy spice note.
- Sea salt: A tiny pinch enhances sweetness and flavor depth; skip if you want a milder, sweeter bar, or try smoked salt for a smoky twist.
Spotlight on key ingredients
Oats:
- Old-fashioned rolled oats: I love how they turn chewy and slightly nutty when toasted—gives the bars a hearty texture. Skip to softer, less toasty bars by using quick oats.
- Coconut flakes: Toasted until golden, their shatter and aroma add nostalgic crunch and a slightly smoky scent. Omit or swap with chopped nuts for different crunch and aroma.
Sweeteners and fat:
- Brown sugar: It’s what gives these bars that deep caramel flavor and moist chewiness. Use coconut sugar for a subtler, earthier sweetness if you prefer less richness.
- Butter: Adds melt-in-your-mouth richness and helps the bars hold together. For dairy-free, try coconut oil—expect a hint of coconut and slightly softer texture.
Notes for ingredient swaps
- Dairy-Free: Swap butter for coconut oil or vegan margarine. Expect slightly different richness and a subtle coconut aroma.
- Sweeteners: Use agave syrup or brown rice syrup instead of honey or maple. These will alter the flavor profile slightly, making it less floral or smoky.
- Oats: Try quick oats for a softer, less chewy texture; note they may bake faster and become crumblier.
- Add-ins: Swap dried fruits for chocolate chips or chopped nuts for different bursts of flavor and texture.
- Coconut flakes: Omit or replace with chopped toasted nuts for a different crunch and aroma.
- Salt: Use flavored salts like smoked salt for an extra layer of flavor or skip if you prefer a sweeter, milder bar.
- Vanilla extract: Substitute with almond or maple extract for a different aromatic note.
Equipment & Tools
- Large mixing bowl: Combine dry ingredients and mix thoroughly.
- Saucepan: Melt butter and heat sweeteners.
- 9-inch square baking pan: Bake the mixture into bars.
- Parchment paper: Prevent sticking and facilitate easy removal.
- Spatula: Mix ingredients and press mixture into pan.
- Sharp knife: Cut into bars once cooled.
Step-by-step guide to oatmeal bars
- Preheat your oven to 180°C (350°F). Line a 9-inch square baking pan with parchment paper, leaving an overhang for easy removal.
- Equipment: Gather a large mixing bowl, spatula, small saucepan, and a baking pan. Purpose: Mix ingredients, melt butter, and bake the bars.
- In the saucepan over medium heat, melt 1/2 cup (115g) unsalted butter, about 2-3 minutes. Watch for a gentle bubbling and a nutty aroma.
- Add 1/2 cup (100g) packed brown sugar, 1/4 cup (60ml) honey or maple syrup, and 1 teaspoon vanilla. Stir until smooth and glossy, about 2 minutes.
- In the mixing bowl, combine 2 cups (180g) old-fashioned oats, 1/2 teaspoon sea salt, and any optional add-ins like coconut or nuts.
- Pour the melted butter mixture into the oats. Stir thoroughly until all oats are coated and sticky, about 1-2 minutes.
- Transfer the mixture into your prepared pan. Press evenly with the back of a spatula or your fingers until flat and compacted.
- Bake for 20-25 minutes. The edges should be golden, and the center slightly firm but still yielding when pressed.
- Remove from oven and let cool in the pan for at least 15 minutes. The bars will firm up as they cool, making them easier to cut.
- Lift the bars out using the parchment overhang. Cut into squares or rectangles with a sharp knife, about 1.5 inches each.
- Finish by letting the bars rest on a wire rack for 10 minutes. This helps set the texture and prevents crumbling.
- Serve slightly warm or at room temperature. Store leftovers in an airtight container at room temp for up to 3 days or in the fridge for a week.
Let the bars cool completely in the pan before lifting out. Slice into squares and serve. Wrap leftovers in foil or store in an airtight container at room temperature or fridge.
How to Know It’s Done
- Edges are golden and slightly crisp after baking.
- Center feels firm yet yields slightly when pressed.
- Bars hold their shape when cut, not crumbly or sticky.
Homemade Oatmeal Bars
Ingredients
Equipment
Method
- Preheat your oven to 180°C (350°F). Line a 9-inch square baking pan with parchment paper, leaving overhang for easy removal.
- Toss the oats on a baking sheet and toast in the oven for about 8-10 minutes until fragrant and golden, stirring halfway through.
- In a small saucepan over medium heat, melt the butter until it bubbles gently and releases a nutty aroma, about 2-3 minutes.
- Add the brown sugar, honey or maple syrup, and vanilla extract to the melted butter. Stir until the mixture is smooth, glossy, and slightly thickened, about 2 minutes.
- In a large mixing bowl, combine the toasted oats, sea salt, and toasted shredded coconut if using. Mix well to evenly distribute.
- Pour the hot butter mixture over the dry ingredients and stir thoroughly until the oats are coated and sticky, about 1-2 minutes.
- Transfer the mixture into your prepared pan and press down firmly with the back of a spatula or moist fingers to create an even, compact layer.
- Bake for 20-25 minutes, until the edges are golden brown and the center feels set but slightly soft when pressed.
- Remove from the oven and let cool in the pan for at least 15 minutes to allow the bars to set and become easier to cut.
- Lift the bars out of the pan using the parchment overhang and place on a cutting board.
- Cut the cooled bars into squares or rectangles with a sharp knife, about 1.5 inches each, and serve.
- Enjoy your homemade oatmeal bars warm or at room temperature. Store leftovers in an airtight container for up to 3 days.
Pro tips for perfect oatmeal bars
- Toast oats lightly before mixing for a nutty aroma that deepens with baking.
- Use room temperature butter to ensure smooth, even melting and better incorporation into the mixture.
- When pressing the mixture into the pan, use the back of a spatula or moist fingers for a compact, even layer.
- Keep an eye on the edges during baking; they should be golden and slightly crisp but not burnt.
- Let the bars cool completely before slicing—this helps them set and prevents crumbling.
- Use a sharp knife dipped in hot water to get clean, smooth cuts without tearing the bars.
Common mistakes and how to fix them
- FORGOT to preheat oven → Always preheat to ensure even baking and proper texture.
- DUMPED too much liquid → Measure carefully; excess moisture makes bars soggy and difficult to cut.
- OVER-TORCHED the edges → Remove early if edges darken; they can quickly go from golden to burnt.
- FORGOT to press mixture firmly → Press mixture evenly for consistent bars and better hold-together-ness.
Quick fixes and pantry swaps
- When mixture feels too dry → Splash in a teaspoon of milk or water to loosen it.
- If bars are crumbly → Patch with a quick drizzle of honey and press again.
- Splash extra vanilla or cinnamon if aroma is faint during baking.
- Shield edges with foil if they brown too quickly in the oven.
- When in doubt, swap out oats for quick oats for a softer, less chewy bar.
Prep, store, and reheat tips
- Prepping the mixture the night before allows the oats to soak slightly, leading to a chewier texture and more even baking. Just cover and refrigerate.
- Bars can be stored in an airtight container at room temperature for up to 3 days, where they develop a slightly firmer chew and intensified caramel notes.
- For longer storage, wrap bars individually in plastic wrap and freeze for up to 1 month. They’ll stay fresh and retain flavor with minimal freezer burn.
- Reheat a single bar briefly in the microwave—about 10 seconds—until warm and fragrant, with a soft, gooey texture. Keep an eye on it to avoid melting too much.
- If reheating from frozen, let the bar thaw slightly at room temp first; then warm gently to avoid over-softening or drying out.
Top questions about oatmeal bars
1. Can I use quick oats instead of old-fashioned oats?
Use old-fashioned rolled oats for the best chewy texture. Quick oats will make the bars softer and less nutty.
2. Can I replace honey with another sweetener?
Yes, you can substitute honey with maple syrup or agave syrup. Expect a slightly different flavor, but it will still bind well.
3. Should I add salt to the mixture?
Add a pinch of sea salt before baking to enhance sweetness and add a slight contrast to the chewy oats.
4. Why are my bars crumbly and how can I fix it?
If the bars turn out too crumbly, press them down firmly and bake a few extra minutes. Cooling fully also helps set the texture.
5. Can I make these bars dairy-free?
To make them dairy-free, swap butter for coconut oil or vegan margarine. Expect a subtle coconut aroma and slightly softer bars.
6. How do I get neat cuts on the bars?
Use a sharp knife dipped in hot water for clean, smooth cuts to prevent crumbling and tearing.
7. How do I know when the oatmeal bars are done?
Bake at 180°C (350°F) for 20-25 minutes until edges are golden and center is set but still slightly soft.
8. Should I cool the bars before cutting?
Let the bars cool completely in the pan for at least 15 minutes before slicing. This helps them set and prevents crumbling.
9. How should I store leftover oatmeal bars?
Store leftovers in an airtight container at room temperature for up to three days or freeze for longer storage.
10. Can I reheat the oatmeal bars?
Reheat in the microwave for about 10 seconds until warm and fragrant, or serve at room temperature for a chewier bite.
These oatmeal bars are more than just a snack; they’re a little piece of memory, a cozy moment wrapped in chewy oats and caramelized sweetness. Making them brings a sense of honest comfort, especially when the kitchen smells of toasted oats and melting butter. They’re simple, unpolished, and perfect for those busy mornings or quiet afternoons when you need a quick, honest bite.
Sharing these bars feels like passing along a small bit of warmth, a reminder that good things often come from humble ingredients. Whether you serve them warm or at room temperature, each bite carries a touch of nostalgia and a hint of something unexpected. They’re a little messy, a little sweet, and just right for right now.

Hi, I’m Ava Bennett. Welcome to Glowing With Pride. I’m Ava Bennett, a professional chef, recipe developer, and lifelong believer that food is one of the most powerful ways we express love, identity, and joy. This space was created from years of working in professional kitchens, countless late nights behind the line, and a deep desire to share food in a way that feels personal, proud, and purposeful. Cooking has never just been my career. It has been my language.


Leave a Reply