There’s something quietly satisfying about a blondie, more than just a cookie without chocolate chips. It’s the way the butter and brown sugar meld into a caramel-sweet aroma that fills the kitchen, stirring up childhood memories of baking with my grandma. This recipe is my little act of nostalgia, a reminder of simpler days when dessert was just about warmth and comfort.
I’ve always loved how blondies don’t demand fancy ingredients or fuss. Just a sturdy mixing bowl, a spatula, and some patience while they bake. It’s honest baking—messy, forgiving, and deeply rewarding when that golden, slightly cracked top finally emerges from the oven. Plus, the smell that drifts through the house? Pure, buttery goodness that makes everyone gather in the kitchen.
Focusing on the nostalgic comfort of childhood, this blondies recipe is my way to reconnect with simpler, sweeter moments in a busy life.
The story behind this recipe
- This blondies recipe comes from a late-night baking session after a long week. I was craving something sweet but didn’t want to fuss over complicated ingredients. The idea of simple, buttery goodness with a chewy, golden edge stuck with me. It’s become a go-to when I need a quick, comforting treat that hits all the right notes.
- Baking these always takes me back to lazy weekends with friends, sharing slices over coffee. The smell of melting butter and caramelized sugar fills the room, making everyone slow down and smile. I love how forgiving this recipe is—no need for perfection, just good, honest baking that satisfies every time.
- heading
- Story Behind This Recipe
Ingredient breakdown: key components
- Butter: I use unsalted, real butter for that rich, creamy base that makes blondies irresistibly tender. Skip margarine if you can for a deeper, nutty flavor.
- Brown sugar: It’s the heart of that caramel vibe—moist, molasses-scented, and essential for that chewy texture. Feel free to mix in a little coconut sugar for extra depth.
- Eggs: Fresh eggs help bind everything and add moisture. Be sure they’re at room temperature—cold eggs can make the batter tricky to mix smoothly.
- Flour: I prefer all-purpose flour, but if you want a slightly denser blondie, try using half whole wheat. Sift it well to avoid lumps.
- Vanilla extract: A splash of pure vanilla brightens the sweetness and adds warmth. Use real vanilla bean paste if you want a richer aroma.
- Add-ins: Chocolate chips or nuts are classic, but I love mixing in dried cranberries or chopped dried apricots. It’s about personalizing that chewy bite.
- Salt: Just a pinch enhances all the sweet, making flavors pop. Don’t skip it—your taste buds will thank you.
Spotlight on key ingredients
Butter:
- I use unsalted, real butter for that rich, creamy base that makes blondies irresistibly tender. Skip margarine if you can for a deeper, nutty flavor.
- Brown sugar: It’s the heart of that caramel vibe—moist, molasses-scented, and essential for that chewy texture. Feel free to mix in a little coconut sugar for extra depth.
- Eggs: Fresh eggs help bind everything and add moisture. Be sure they’re at room temperature—cold eggs can make the batter tricky to mix smoothly.
Brown sugar:
- It’s the heart of that caramel vibe—moist, molasses-scented, and essential for that chewy texture. Feel free to mix in a little coconut sugar for extra depth.
- Vanilla extract: A splash of pure vanilla brightens the sweetness and adds warmth. Use real vanilla bean paste if you want a richer aroma.
- Add-ins: Chocolate chips or nuts are classic, but I love mixing in dried cranberries or chopped dried apricots. It’s about personalizing that chewy bite.
Notes for ingredient swaps
- Dairy-Free: Use coconut oil or vegan butter instead of butter for a rich, slightly coconut-y flavor.
- Sweetener Swap: Maple syrup or honey can replace brown sugar, but expect a more floral or caramel note.
- Gluten-Free: Almond flour or a gluten-free baking blend can work, though the texture might be a tad denser.
- Egg-Free: Mashed bananas or flaxseed meal mixed with water make good substitutes, adding a hint of fruitiness.
- Add-ins: Swap chocolate chips for dried fruit, nuts, or seeds to customize texture and flavor.
- Vanilla: Pure vanilla extract can be replaced with vanilla bean paste or omit for a more subdued aroma.
- Salt: A pinch of sea salt can be replaced with flavored salts or omitted, but it enhances sweetness and depth.
Equipment & Tools
- 9×9 inch baking pan: To hold and bake the blondie batter evenly.
- Mixing bowls: For combining wet and dry ingredients separately.
- Spatula: To fold ingredients and spread batter smoothly.
- Oven: To bake the blondies at a steady heat.
- Toothpick or cake tester: To check doneness in the center.
Step-by-step guide to blondies
- Preheat your oven to 175°C (350°F). Grease a 9×9 inch baking pan or line it with parchment paper for easy removal.
- In a medium bowl, melt 115g (1/2 cup) of unsalted butter. Let it cool slightly so it’s warm but not hot.
- In a large mixing bowl, combine 150g (3/4 cup) light brown sugar and 1 tsp vanilla extract. Stir in the melted butter until smooth and fragrant.
- Add 2 large eggs, one at a time, mixing well after each addition. The batter should look glossy and slightly thickened.
- Sift in 150g (1 1/4 cups) all-purpose flour, 1/2 tsp baking powder, and 1/4 tsp salt. Fold gently until just combined—don’t overmix.
- If using, fold in 100g (1/2 cup) chocolate chips or chopped nuts for extra texture. This is where you personalize your blondies.
- Pour the batter into your prepared pan. Use a spatula to spread it evenly to the edges.
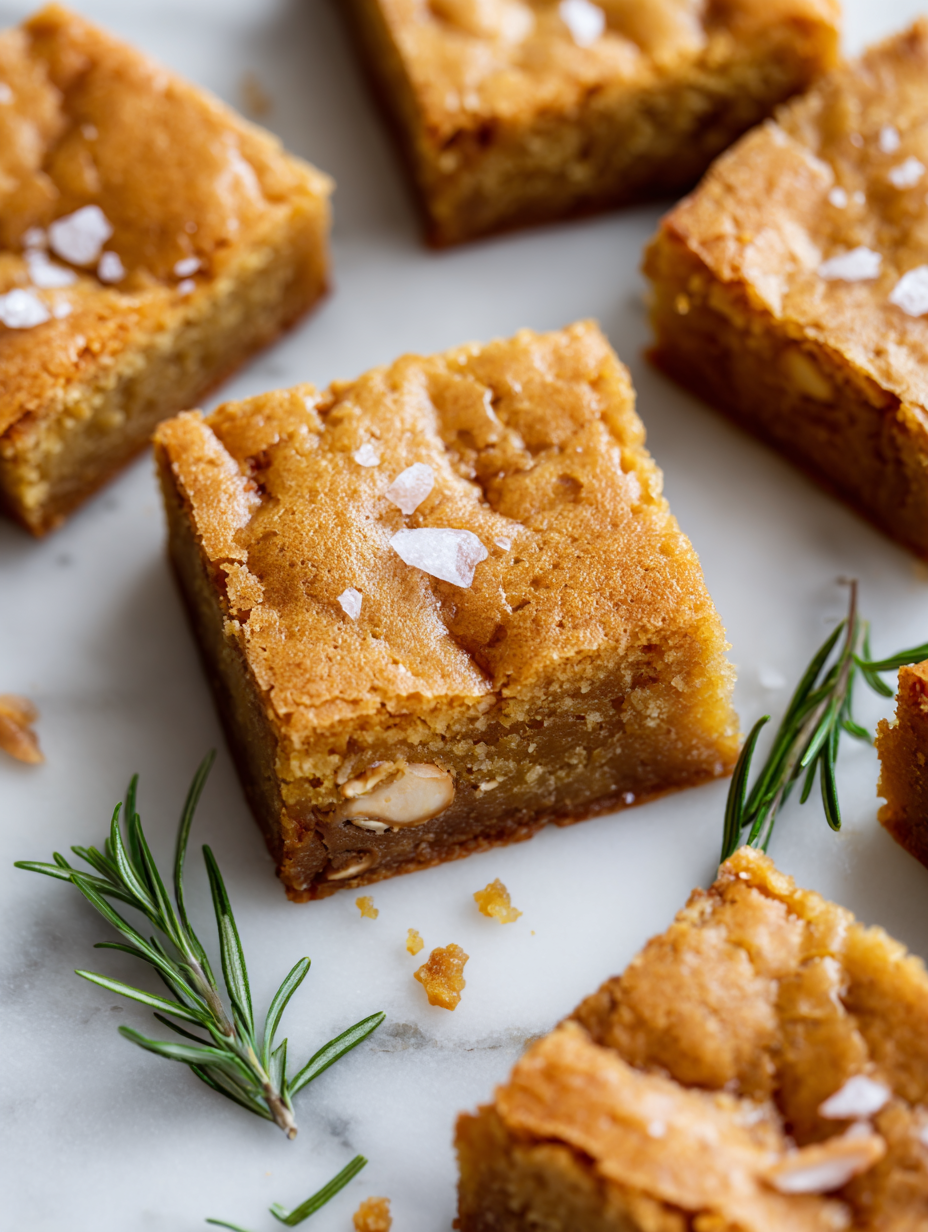
- Bake for 20-25 minutes. The top should be golden and slightly cracked, with the edges pulling away from the sides.
- Check doneness: the center should be just set but still slightly gooey. A toothpick inserted should come out with moist crumbs, not wet batter.
- Remove from oven and let cool in the pan for about 10 minutes. Then transfer to a wire rack if you used parchment, or leave in pan to cool completely.
- Allow the blondies to rest for at least 15 minutes. They’ll firm up and become easier to cut without crumbling. Slice into squares and enjoy!
Let the blondies cool in the pan for 10 minutes, then transfer to a wire rack if needed. Slice into squares once fully cooled for clean cuts and serve with a glass of milk or coffee.
How to Know It’s Done
- Golden top with slight crack; edges slightly pulled away from pan.
- Center feels just set when gently jiggled; not runny or overly soft.
- Toothpick test: moist crumbs, no wet batter.
Buttery Blondies
Ingredients
Equipment
Method
- Preheat your oven to 175°C (350°F) and grease your baking pan or line it with parchment paper for easy removal.
- Melt the unsalted butter in a microwave or on the stovetop and let it cool slightly until warm and fragrant.
- In a large bowl, combine the brown sugar and vanilla extract. Pour in the warm melted butter and mix until smooth and aromatic.
- Add the eggs one at a time, beating well after each addition until the mixture is glossy and slightly thickened.
- Sift the all-purpose flour and salt into the wet mixture, then gently fold with a spatula until just combined—don’t overmix to keep the blondies tender.
- If you’re adding chocolate chips or nuts, fold them in now for extra texture and flavor.
- Pour the batter into your prepared pan, spreading it evenly with a spatula to reach all edges.
- Bake in the oven for 20-25 minutes, until the top is golden and slightly cracked, and a toothpick inserted in the center comes out with moist crumbs.
- Remove from the oven and let cool in the pan for about 10 minutes, allowing them to set and develop their chewy texture.
- Transfer to a wire rack if you lined your pan with parchment, or leave in the pan to cool completely for cleaner slices.
- Once cooled, slice into squares and serve, enjoying the warm, buttery aroma and chewy, golden crumb.
Pro tips for perfect blondies
- Use high-quality butter for a richer, more fragrant blondie. The scent of melted butter should be warm and inviting.
- Brown sugar adds moisture and chewiness—feel the stickiness and molasses aroma as you mix it in.
- Room temperature eggs blend more smoothly, avoiding lumps and ensuring even texture.
- Gently fold in your add-ins—overmixing will make the blondies tough, so stop as soon as ingredients are just combined.
- Bake until the top is golden and cracked—use your nose and sight to judge perfection, not just time.
- Cool in the pan for at least 10 minutes—rushing this step can cause crumbling or uneven slices.
- For an extra caramelized flavor, sprinkle a tiny pinch of sea salt on top right after baking.
Common mistakes and how to fix them
- FORGOT to check oven temperature → calibrate regularly to avoid uneven baking.
- DUMPED the batter into the pan → ensure even spreading for uniform baking.
- OVER-TORCHED the edges → cover with foil halfway through to prevent burning.
- MISSED resting time → let blondies cool fully for cleaner slices and better texture.
Quick fixes and pantry swaps
- When batter is too thick, splash in a teaspoon of milk to loosen.
- If edges are over-browned, shield with foil and lower oven temperature.
- Splash a few drops of water on a hot pan to crackle and revive stuck bits.
- When blondies are underbaked, pop back in oven for 3-5 minutes until set.
- Patch a cracked top with a small dollop of batter and re-bake for a uniform surface.
Prep, store, and reheat tips
- You can prep the batter a day in advance—cover tightly and refrigerate. It firms up overnight, making mixing easier later.
- Store baked blondies in an airtight container at room temperature for up to 3 days—freshness and softness peak within this window.
- For longer storage, wrap well and freeze for up to 1 month. Thaw at room temp, and the edges might be slightly firmer but still chewy.
- Reheat slices gently in the microwave for about 10-15 seconds until warm and fragrant. Keep an eye on texture—avoid overheating to prevent dryness.
- The aroma of reheated blondies should be rich caramel and buttery, with a chewy, slightly gooey center that mimics freshly baked.
Top questions about blondies
1. Can I use melted butter instead of softened?
Use softened butter for easy mixing and a tender crumb. Cold butter will make your batter lumpy.
2. What if I only have white sugar?
Brown sugar gives blondies that chewy, caramel flavor and moist texture. Substitute with coconut sugar for a slightly different sweetness.
3. How do I know when blondies are done?
Bake until the edges are golden and a toothpick comes out with moist crumbs. Do not overbake or they’ll dry out.
4. Can I add chocolate chips or nuts?
Adding nuts or chocolate chips is optional. Fold them in gently just before pouring the batter into the pan.
5. Should I let them cool before cutting?
Let the blondies cool in the pan for at least 10 minutes before slicing. This helps them set and prevents crumbling.
6. What size pan works best?
Use a 9×9 inch pan for thick, chewy blondies. Line with parchment for easy removal.
7. How long do blondies stay fresh?
Store blondies in an airtight container at room temperature for up to 3 days. Wrap tightly to keep fresh.
8. Can I freeze blondies?
You can freeze baked blondies for up to a month. Reheat briefly in the microwave for a warm treat.
9. Why did my blondies crack on top?
If the top cracks too much, gently cover with foil partway through baking to prevent burning.
10. How important is vanilla in blondies?
For a richer flavor, use high-quality vanilla extract or vanilla bean paste. It makes a noticeable difference.
Baking these blondies feels like a small act of rebellion—simple, honest, and deeply satisfying. The warm aroma of butter and caramelizing sugar fills the house, inviting everyone to gather around the table.
They’re perfect for a quiet afternoon or a quick get-together, when you need a sweet moment that’s easy to share. Sometimes, it’s the simplest recipes that leave the biggest impression, especially when they’re made with love and a little bit of chaos.

Hi, I’m Ava Bennett. Welcome to Glowing With Pride. I’m Ava Bennett, a professional chef, recipe developer, and lifelong believer that food is one of the most powerful ways we express love, identity, and joy. This space was created from years of working in professional kitchens, countless late nights behind the line, and a deep desire to share food in a way that feels personal, proud, and purposeful. Cooking has never just been my career. It has been my language.


Leave a Reply