Shortbread cookies are one of those baking projects that seem simple but hide a world of subtlety. It’s all about the texture — how they crumble, melt, or stay firm — and that can be tweaked with tiny ingredient choices and baking times. I’ve spent years experimenting, and now, I see every batch as a little experiment in texture.
What I love most is how easy it is to personalize these cookies. A pinch more salt, a dash of vanilla, or even a hint of lemon zest can shift the whole vibe. It’s like a blank canvas, waiting for your hand to add a whisper of flavor and a tweak in the bake to get that perfect crunch or tender crumb. That’s the magic, really — turning a basic recipe into your own signature.
Focusing on how the texture of shortbread can be customized through subtle ingredient tweaks and baking techniques, turning a simple cookie into a personal canvas.
The story behind this recipe
- This recipe came from a baking day when I was craving something buttery and simple, but with a little twist of nostalgia. I remember the smell of melting butter filling the kitchen, a reminder of my grandmother’s baking sessions, where everything was made by eye and with love. I wanted a cookie that could feel both familiar and just a little special, perfect for those quiet moments when you need a break from the chaos.
- Over the years, I’ve tweaked the traditional shortbread to make it more forgiving — a touch of extra butter here, a pinch of sea salt there. It’s one of those recipes that feels like home, yet it invites you to play with flavors and textures. It’s become a staple in my baking arsenal, especially when I want something dependable that still feels indulgent and personal.
- heading
- story_type
Key Ingredients Breakdown
- Unsalted butter: I always use high-quality, European-style butter for that rich, melt-in-your-mouth feel. Skip the salted stuff or reduce salt if you prefer a less salty cookie.
- All-purpose flour: I sift mine to avoid lumps and get a tender crumb. If you’re gluten-sensitive, try a soft wheat flour for a slightly more delicate texture.
- Granulated sugar: I prefer superfine for a little quicker dissolving—gives a finer crumb. For a nuttier flavor, try powdered sugar, but watch the texture.
- Vanilla extract: I love a good splash of vanilla here—it warms up the cookies with a cozy aroma. Lemon zest or almond extract can add a bright or nutty twist.
- Salt: A pinch of fine sea salt enhances sweetness and flavor depth. If you’re using salted butter, cut back on the added salt to keep balance.
- Optional add-ins: I sometimes fold in a sprinkle of lavender or chopped pistachios for extra personality. Keep it subtle so it doesn’t overpower the buttery base.
Spotlight on key ingredients
Unsalted butter:
- I love using European-style butter—its high fat content melts smoothly and creates that tender, flaky crumb. If you only have salted, reduce the added salt accordingly.
- Butter’s behavior: It softens quickly at room temp, so I keep it ready ahead of mixing. When creamed, it should feel light and slightly fluffy, not greasy or stiff.
All-purpose flour:
- I prefer sifting mine to keep the dough smooth and prevent lumps. It’s the backbone for that delicate, crumbly texture we’re after.
- Flour’s role: During baking, it helps the cookies hold shape but still crumble nicely. Too much can make them tough; too little, too fragile.
Notes for ingredient swaps
- Dairy-Free: Swap butter for coconut oil or vegan butter. Expect slightly different melting and richness, but still buttery enough.
- Gluten-Free: Use almond or rice flour instead of all-purpose. Cookies may be crumblier, with a nuttier flavor and lighter texture.
- Sugar Alternatives: Replace granulated sugar with maple syrup or honey. Be aware of added moisture and adjust baking time slightly.
- Flavor Variations: Add citrus zest, almond extract, or a pinch of cinnamon for a personalized twist that still keeps the basic structure.
- Salt: Reduce or omit if using salted butter to keep flavor balanced. A pinch of sea salt enhances sweetness and adds depth.
- Sweeteners: For a less sweet cookie, cut the sugar by 25% and add a little extra vanilla or lemon zest for brightness.
- Texture Boosters: Mix in chopped nuts or dried fruit for added crunch or chew, but scale back flour slightly to compensate.
Equipment & Tools
- Mixing bowl: Combine ingredients evenly.
- Spatula: Cream butter and mix dough.
- Rolling pin: Roll out dough to even thickness.
- Baking sheet with parchment: Bake cookies evenly and prevent sticking.
Step-by-step guide to shortbread
- Gather your equipment: a medium mixing bowl, a sturdy spatula, a rolling pin, and a baking sheet lined with parchment paper. Preheat your oven to 160°C (320°F).
- In the bowl, combine 1 cup (225g) unsalted butter, softened but not melted. Use your fingers or a fork to cream it until smooth, about 2 minutes. It should be fluffy and pale.
- Add 1/2 cup (100g) granulated sugar and a teaspoon of vanilla extract. Mix until just combined, ensuring the sugar starts to dissolve and the mixture feels airy.
- Stir in 2 cups (250g) all-purpose flour, a pinch of salt, and mix until the dough just comes together. It might look a little crumbly but should hold when pressed.
- Turn the dough onto a lightly floured surface. Knead gently a few times until smooth. Roll out to about 1/4 inch (6mm) thick. If it cracks, let it rest for 5 minutes, then continue.
- Cut into your desired shapes with cookie cutters or a knife. Transfer to the prepared baking sheet, spacing about 1 inch apart. Chill in the fridge for 15 minutes to firm up.
- Bake in the preheated oven for 18-20 minutes, or until the edges are lightly golden. The smell should be buttery and sweet, with a hint of vanilla.
- Remove from oven, let cool on the sheet for 5 minutes, then transfer to a wire rack. The edges should be crisp, and the center tender but firm.
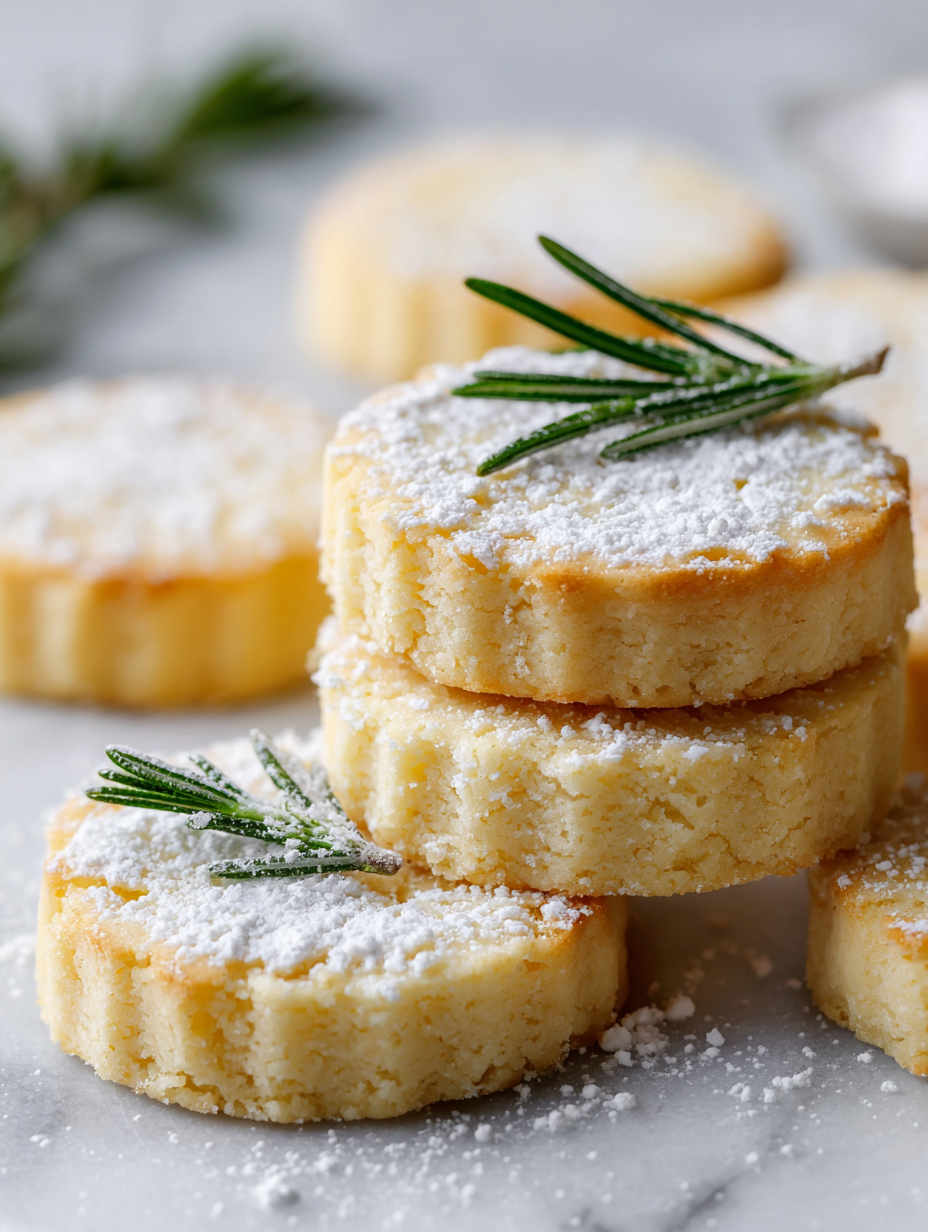
- Once completely cooled, dust with a light sprinkle of powdered sugar or leave plain. Serve with tea or a glass of milk, still warm from the oven.
Chill the shaped dough in the fridge for 15 minutes to prevent spreading. After baking, cool on a wire rack until firm. Finish with a dusting of powdered sugar or a drizzle of melted chocolate if desired.
How to Know It’s Done
- Cookies are golden at the edges and firm when touched.
- A gentle press leaves an indentation without sticking or cracking.
- The aroma is rich, buttery, with vanilla notes filling the room.
Classic Shortbread Cookies
Ingredients
Equipment
Method
- Gather your equipment: a mixing bowl, spatula, rolling pin, and a baking sheet lined with parchment. Preheat your oven to 160°C (320°F).
- In the bowl, cream the softened butter with the sugar using a spatula or your fingers until the mixture is light, pale, and slightly fluffy, about 2 minutes. You should hear a gentle squeak and see a smooth texture.
- Add the vanilla extract and mix it in just until incorporated, releasing a warm, sweet aroma.
- Sift the all-purpose flour and sprinkle a pinch of sea salt into the bowl. Gently fold the dry ingredients into the buttery mixture until just combined, avoiding overmixing to keep the dough tender.
- Turn the dough onto a lightly floured surface and knead it gently a few times until it comes together smoothly. This helps relax the gluten and makes rolling easier.
- Roll out the dough evenly to about 1/4 inch (6mm) thickness, turning it occasionally to maintain uniformity. If cracks form, let it rest for a few minutes to relax.
- Cut into your preferred shapes with cookie cutters or a knife, then transfer the shapes onto the prepared baking sheet. Chill the shaped dough in the fridge for about 15 minutes to firm up and prevent spreading.
- Bake the cookies in the preheated oven for 18-20 minutes, or until the edges are just lightly golden and the aroma is warm and buttery. Keep an eye on them to prevent overbaking.
- Remove from the oven and let the cookies cool on the baking sheet for about 5 minutes. Then, transfer them to a wire rack to cool completely, allowing their delicate crumb to set.
- Once cooled, optionally dust with powdered sugar or serve plain to enjoy the tender, crisp texture. These cookies are perfect with tea or a glass of milk.
Notes
Pro tips for perfect shortbread
- Bolded mini-head: Keep butter slightly softened but not melted for easier mixing and a tender crumb.
- Bolded mini-head: Chill your dough for at least 15 minutes—cold dough spreads less during baking, keeping shape.
- Bolded mini-head: Use a light touch when mixing flour into butter—overmixing can toughen cookies.
- Bolded mini-head: When rolling out, turn dough frequently for an even thickness and prevent sticking.
- Bolded mini-head: Bake until edges are just golden—resist the urge to bake longer, or cookies may become brittle.
- Bolded mini-head: For a crispier texture, bake a minute or two longer; for tender, remove earlier and let cool.
- Bolded mini-head: Cool cookies completely on a wire rack before storing—warm cookies trap moisture and get soggy.
Common baking mistakes and solutions
- FORGOT to check oven temperature → Use an oven thermometer for accuracy.
- DUMPED in too much flour → Lightly spoon flour to avoid dry cookies.
- OVER-TORCHED edges → Remove cookies when edges are just golden, not dark.
- MISSED chilling step → Chill dough for 15 minutes to prevent spreading.
Quick fixes and pantry swaps
- When cookies spread too much → Chill dough for 15 minutes before baking.
- If cookies are too crumbly → Add a tiny splash of water to the dough and mix gently.
- Splash with vanilla if aroma is weak—boosts that buttery scent instantly.
- Patch cracked cookies with a dab of warm melted chocolate for a prettier finish.
- Shield cookies with parchment if they bubble or crack during baking—keeps shape intact.
Prep, store, and reheat tips
- You can prepare the cookie dough up to 2 days in advance; wrap tightly in plastic and keep in the fridge. The dough firms up and becomes easier to roll.
- Store baked shortbread cookies in an airtight container at room temperature for up to 1 week. Keep them in a cool, dry place to maintain crispness and prevent staleness.
- For longer storage, freeze cookies in a sealed container or freezer bag for up to 3 months. Let them come to room temperature before serving to revive the aroma and texture.
- Reheat cookies by warming them in a low oven at 150°C (300°F) for 5 minutes. They’ll regain a subtle warmth and the buttery scent will bloom again. Avoid overheating to keep them crisp and tender.
Top questions about shortbread cookies
1. Should I soften the butter before mixing?
Use cold butter straight from the fridge for the best texture and ease of mixing.
2. Do I need to chill the dough?
Yes, chilling the dough for at least 15 minutes helps prevent spreading and makes it easier to handle.
3. How do I know when the cookies are done?
Bake until the edges are just lightly golden—overbaking makes cookies too crispy and dry.
4. How should I store leftover shortbread?
Store in an airtight container at room temperature for up to a week, or freeze for longer storage.
5. Can I omit the salt?
Adding a pinch of sea salt enhances flavor; feel free to skip if you prefer a sweeter cookie.
6. Can I make these gluten-free?
You can substitute almond flour for part of the all-purpose flour for a nuttier flavor and softer crumb.
7. What can I add to customize the cookies?
Chop finely or leave whole any add-ins like nuts or dried fruit for extra texture.
8. My dough is too soft, what do I do?
If the dough feels too soft, chill it longer or add a little more flour to firm it up.
9. How do I keep the cookies tender?
Use a light hand when mixing flour to avoid tough cookies; overmixing develops gluten and toughens the crumb.
10. How can I make the cookies crunchier?
For a crisper cookie, bake an extra minute or two, keeping an eye on the color and smell.
Baking these cookies is a small act of patience that pays off in buttery, crisp bites. There’s something grounding about mixing simple ingredients and watching them transform in the oven, filling the kitchen with warmth and vanilla. These shortbread cookies remind me that sometimes, the simplest recipes are the most satisfying.
Whether you’re making them for a quiet afternoon or sharing with friends, they carry a quiet tradition and a little piece of home. No matter how many batches I bake, each one still feels like a small celebration of good, honest baking. That’s what keeps me coming back to this classic recipe, again and again.

Hi, I’m Ava Bennett. Welcome to Glowing With Pride. I’m Ava Bennett, a professional chef, recipe developer, and lifelong believer that food is one of the most powerful ways we express love, identity, and joy. This space was created from years of working in professional kitchens, countless late nights behind the line, and a deep desire to share food in a way that feels personal, proud, and purposeful. Cooking has never just been my career. It has been my language.


Leave a Reply