There’s a certain charm in turning a near-empty jar of peanut butter into a batch of cookies that feel like a little messy celebration. It’s not about perfection but about embracing the chaos—spreading out the dough, adding a pinch more salt, or skipping a few steps just because you’re craving that familiar, nutty aroma filling the kitchen.
This recipe is a snapshot of my kitchen’s everyday chaos—clumsy scoops, accidental extra dollops, and the satisfying crackle of sugar on the edges. It’s honest baking, shaped by leftover jars and spontaneous cravings, and somehow those little imperfections make them even better, more personal, more real.
Baking these peanut butter cookies reminds me how simple ingredients can turn into something comforting and imperfectly perfect. It’s a reminder to enjoy the process, not just the end result—especially when the house smells like toasted peanuts and melting butter, pulling everyone in for a quick, sweet break.
Using leftover peanut butter jars to create a nostalgic, imperfect cookie that embodies the chaos and charm of home baking.
The inspiration behind these cookies
- Making these peanut butter cookies started from a forgotten jar in the back of my pantry. One day, I just grabbed it, looked at that thick, oozing peanut butter, and thought, why not turn it into something sweet and a little chaotic? Baking like this reminds me that imperfect is often the best way to go, especially when you’re craving something comforting that doesn’t demand perfection.
- Every time I bake these, I think about the messy, joyful mornings in my childhood kitchen—clumsy hands, sticky fingers, and the smell of toasted peanuts filling the air. It’s a recipe born from those nostalgic moments, but also from my love for spontaneous baking that celebrates the little chaos in our routines.
- heading
- story_type
Key ingredients and tips
- Creamy peanut butter: I prefer a natural, runny variety that spreads easily and gives a rich, nutty aroma. If yours is too stiff, warm it slightly—just a few seconds in the microwave should loosen it up nicely.
- Brown sugar: Its molasses notes add depth, and I love how it caramelizes a bit during baking, creating crispy edges. If you want a softer cookie, try a bit less sugar, but don’t skip it—trust me, flavor loves it.
- Eggs: They bind everything together, but I’ve swapped in a flax egg for a vegan spin. It adds a slight nuttiness and helps with the chewy texture, which is crucial here.
- Flour: I stick mostly to all-purpose, but a touch of oats can add chewiness and a rustic feel. If you’re gluten-free, almond flour works—just expect a denser, more crumbly cookie.
- Baking soda: This is your leavening hero—makes the cookies puff just enough. If you forget it, they stay flat and dense, but a quick pinch in the mix saves the day.
- Vanilla extract: A splash brightens everything, highlighting the peanut butter’s richness. Skip it if you’re out, but consider a pinch of salt in its place to enhance the flavor.
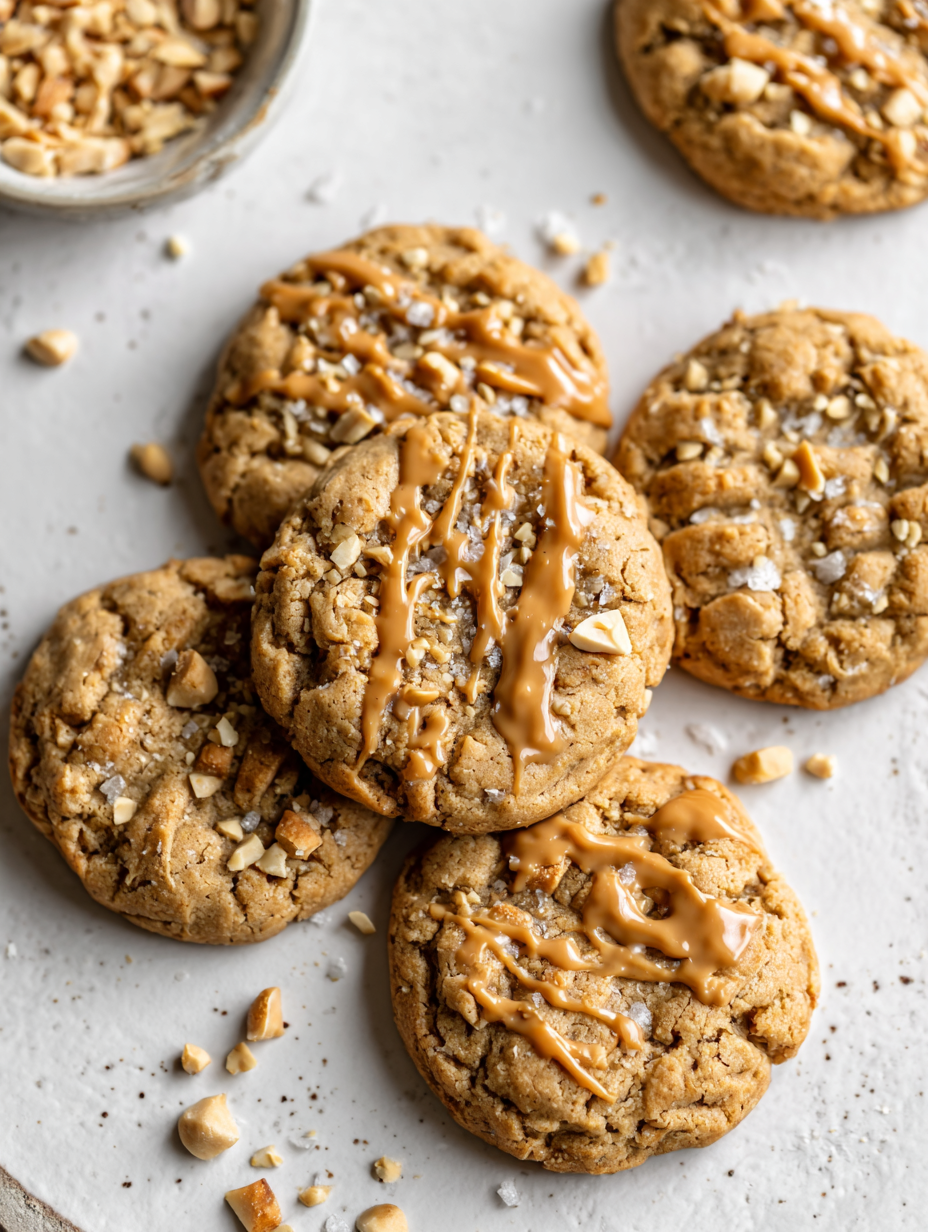
- Sugar crystals or coarse sugar: I sprinkle a little on top before baking for that crackly, sugary crunch. If you don’t have it, a light brushing with egg wash can give a shiny finish—just watch for over-browning.
Spotlight on key ingredients
Peanut Butter:
- Creamy peanut butter: I prefer a natural, runny variety that spreads easily and gives a rich, nutty aroma. If yours is too stiff, warm it slightly—just a few seconds in the microwave should loosen it up nicely.
- Brown sugar: Its molasses notes add depth, and I love how it caramelizes a bit during baking, creating crispy edges. If you want a softer cookie, try a bit less sugar, but don’t skip it—trust me, flavor loves it.
- Eggs: They bind everything together, but I’ve swapped in a flax egg for a vegan spin. It adds a slight nuttiness and helps with the chewy texture, which is crucial here.
Other Key Ingredients:
- Flour: I stick mostly to all-purpose, but a touch of oats can add chewiness and a rustic feel. If you’re gluten-free, almond flour works—just expect a denser, more crumbly cookie.
- Baking soda: This is your leavening hero—makes the cookies puff just enough. If you forget it, they stay flat and dense, but a quick pinch in the mix saves the day.
- Vanilla extract: A splash brightens everything, highlighting the peanut butter’s richness. Skip it if you’re out, but consider a pinch of salt in its place to enhance the flavor.
Notes for ingredient swaps
- Dairy-Free: Swap butter for coconut oil or a neutral-flavored vegetable oil. It might make the cookies a bit crumblier, but they’ll still be rich and satisfying.
- Sugar Alternatives: Use maple syrup or honey instead of sugar, but reduce the amount slightly to prevent spreading too much.
- Gluten-Free: Almond flour or gluten-free baking blend can work well. Expect a denser, more rustic texture with almonds’ natural oils.
- Vegan: Replace the egg with a flax egg (1 tablespoon ground flaxseed + 3 tablespoons water). It adds a nutty note and helps bind.
- Extra Crunch: Sprinkle coarse sugar or sea salt on top before baking for added texture and flavor contrast.
- Peanut Butter: Crunchy peanut butter adds texture, while natural or less sweet peanut butter emphasizes the nutty flavor. Adjust sweetness accordingly.
- Add-Ins: Mix in dark chocolate chips or chopped nuts for extra flavor and texture variations.
Equipment & Tools
- Large mixing bowl: To combine wet and dry ingredients comfortably.
- Spatula: For mixing and scraping down the sides.
- Baking sheet: To hold the cookies during baking.
- Parchment paper: To prevent sticking and ensure easy cleanup.
- Oven: To bake the cookies at a consistent temperature.
Step-by-step guide to peanut butter cookies
- Gather your equipment: a large mixing bowl, a spatula, a baking sheet, and parchment paper. Preheat your oven to 180°C (350°F).
- In the bowl, combine 1 cup of creamy peanut butter with ¾ cup of brown sugar. Mix until smooth and slightly fluffy, about 2 minutes.
- Add 1 large egg and 1 teaspoon of vanilla extract to the mixture. Stir well until fully incorporated, scraping down the sides.
- In a separate small bowl, whisk together 1 cup of all-purpose flour, ½ teaspoon of baking soda, and a pinch of salt.
- Gradually add the dry ingredients to the wet mixture. Mix gently until just combined. The dough should be thick and slightly sticky.
- Scoop tablespoon-sized portions of dough and roll into balls. Place them on the prepared baking sheet with about 2 inches apart.
- Flatten each ball slightly with a fork, creating a crisscross pattern. If desired, sprinkle a tiny pinch of coarse sugar on top for crunch.
- Bake for 10-12 minutes. Watch for the edges to turn golden and the tops to crackle. They’ll look slightly underdone but will firm up as they cool.
- Remove from oven and let the cookies rest on the baking sheet for 5 minutes. They will be soft but will set as they cool.
- Transfer to a wire rack and cool completely. The cookies should be golden around the edges, with a slight sheen from the peanut butter.
Let the cookies cool on a wire rack for at least 10 minutes to set their texture. Serve warm or at room temperature, enjoying the rich, nutty aroma filling your kitchen.
How to Know It’s Done
- Edges turn golden and crackle, indicating doneness.
- Cookies slightly firm but still soft when gently pressed.
- A pleasant nutty aroma fills the kitchen, signaling they’re ready.
Imperfect Peanut Butter Cookies
Ingredients
Equipment
Method
- Preheat your oven to 180°C (350°F) and line a baking sheet with parchment paper.
- In a large mixing bowl, combine the creamy peanut butter and brown sugar. Use a spatula to stir until the mixture is smooth and slightly fluffy, with a rich aroma filling the air.
- Add the egg and vanilla extract to the bowl. Whisk or stir until the ingredients are fully incorporated, and the mixture becomes glossy and sticky.
- In a separate small bowl, whisk together the flour, baking soda, and salt. Gradually add these dry ingredients to the wet mixture, folding gently until just combined and the dough thickens.
- Using a tablespoon or cookie scoop, portion out rounds of dough and roll them into balls. Place them on the prepared baking sheet, spacing about 2 inches apart.
- Gently flatten each dough ball with the back of a fork, creating a crisscross pattern. For extra crunch, sprinkle a pinch of coarse sugar on top of each cookie.
- Bake the cookies in the preheated oven for 10 to 12 minutes, until the edges turn golden and crackle slightly. The tops may look a little underdone, which is perfect for chewy centers.
- Remove the baking sheet from the oven and let the cookies rest for about 5 minutes. They will be soft but will firm up as they cool, developing a crackly, crispy edge.
- Transfer the cookies to a wire rack to cool completely. The aroma of toasted peanuts and melting butter will fill your kitchen as they cool down.
- Enjoy these imperfectly perfect peanut butter cookies warm or at room temperature, savoring their chewy centers and crispy edges with a nutty aroma in the air.
Pro tips for perfect peanut butter cookies
- Chill the dough for at least 30 minutes to prevent spreading during baking.
- Use a fork to create that classic crisscross pattern—press gently, don’t flatten too much.
- Keep an eye on the oven; cookies turn golden around the edges in 10-12 minutes.
- Rotate the baking sheet halfway through baking for even color and texture.
- Slightly underbake; cookies will firm up as they cool for that perfect chewy center.
- For softer cookies, add a tablespoon of milk or a splash of water to the dough.
- Sprinkle coarse sugar on top before baking for a crackly, crunchy finish.
Common mistakes and how to fix them
- FORGOT to check oven temperature → Use an oven thermometer for accuracy.
- DUMPED too much sugar → Reduce sugar slightly to prevent spreading and over-sweetness.
- OVER-TORCHED cookies → Remove earlier if edges darken too quickly; lower oven temp slightly.
- MISSED the resting time → Always let cookies cool fully to set texture and avoid breakage.
Quick fixes and pantry swaps
- When dough is too sticky → Dust with a little flour to shape more easily.
- If cookies spread too much → Chill the dough for 15 minutes before baking.
- Splash a few drops of water on dry spots to revive dry, crumbly cookies.
- Patch cracked cookies with a tiny dab of peanut butter for extra flavor.
- Shield burnt edges by tenting with foil if browning too quickly.
Prep, store, and reheat tips
- Dough can be prepared a day ahead; refrigerate in an airtight container for up to 24 hours. The chill enhances flavor and makes scooping easier, with a slightly firmer texture that bakes up beautifully.
- Cookies store well in an airtight container at room temperature for up to 5 days. Expect the edges to stay crisp, but they may soften slightly as they sit—reheat gently to revive crunch.
- Freeze baked cookies for longer storage—up to 3 months. Wrap individually in plastic wrap, then in foil. Thaw at room temperature for a soft, chewy treat, or warm in the oven for a crispy edge.
- Reheating: Warm cookies in a 150°C (300°F) oven for 3–5 minutes. The smell of roasted peanuts and melted butter will hit your nose, and they’ll regain a slight crackle on top.
Top questions about peanut butter cookies
1. How do I know when the cookies are done?
Look for a cookie that’s golden around the edges and slightly soft in the center. The smell should be nutty and inviting.
2. My dough is too sticky to scoop, what do I do?
If your dough is too sticky, refrigerate it for 15-20 minutes before shaping. It firms up and becomes easier to handle.
3. How long do peanut butter cookies stay fresh?
Cookies are best enjoyed fresh but can be stored in an airtight container at room temperature for up to 5 days. Reheat in the oven for a few minutes to refresh the crunch.
4. Can I make these cookies dairy-free?
Replace butter with coconut oil for a dairy-free version. It can make the cookies slightly crumblier but still deliciously nutty.
5. Can I use crunchy peanut butter?
Use crunchy peanut butter for extra texture or natural peanut butter for a more intense nutty flavor. Adjust sugar if using less sweet varieties.
6. What’s the ideal baking temperature and time?
Bake at 180°C (350°F) for 10-12 minutes. Keep an eye on the edges—they should turn golden and crackle slightly.
7. Should I chill the dough before baking?
Chill the dough for at least 30 minutes to prevent spreading. This also deepens the peanut flavor.
8. Should I add salt on top before baking?
Yes, adding a pinch of sea salt on top before baking enhances the overall nutty flavor and creates a nice contrast.
9. What if my cookies spread too much?
If the cookies spread too much, refrigerate the shaped dough for 15 minutes before baking. This helps them hold their shape.
10. How can I make the cookies softer or crunchier?
For a softer cookie, add a tablespoon of milk or water to the dough. For crunchier cookies, bake a minute longer and sprinkle sugar on top.
Baking these peanut butter cookies feels like a small act of rebellion—embracing the mess and the smells that fill the house. They’re imperfect, just like days that don’t go as planned, but somehow still comforting and real.
In the end, it’s about the little moments—licking the spoon, sharing a warm cookie, or just enjoying that rich, nutty aroma that lingers long after baking. These cookies remind me that sometimes, the best things come from leftover jars and a little bit of chaos.

Hi, I’m Ava Bennett. Welcome to Glowing With Pride. I’m Ava Bennett, a professional chef, recipe developer, and lifelong believer that food is one of the most powerful ways we express love, identity, and joy. This space was created from years of working in professional kitchens, countless late nights behind the line, and a deep desire to share food in a way that feels personal, proud, and purposeful. Cooking has never just been my career. It has been my language.


Leave a Reply