These peanut butter muffins started as a pantry experiment, and somehow, adding a handful of crispy bacon bits took them from ordinary to addictive. The salty crunch pairs perfectly with the rich, nutty flavor, making each bite feel like a little indulgence for breakfast or an afternoon snack.
I love how versatile this recipe is—swap out dark chocolate chunks for chopped nuts or dried fruit, and suddenly, it’s a whole new treat. It’s one of those baked goods that feels comforting but still exciting, especially when you want something familiar but with a twist that surprises your taste buds.
Baking these muffins is a bit like a small act of rebellion—turning what could be a simple peanut butter cookie into a portable, flavorful snack that’s both satisfying and a little bit unexpected. They remind me that the best recipes are often born from a little chaos and a lot of curiosity.
Focusing on how to make peanut butter muffins that incorporate unexpected ingredients like chopped bacon or dark chocolate chunks, turning a simple comfort food into a savory or indulgent surprise.
Unexpected Twists in a Classic
- Baking these muffins feels like a small celebration, especially when the aroma of roasted peanuts fills the kitchen.
- I get a kick out of how a spoonful of jam swirled into the batter transforms the flavor into something unexpectedly bright.
- There’s a quiet satisfaction in pulling these out of the oven and seeing that perfect, slightly cracked top—like a little badge of honor.
Unexpected Twists in a Classic
This recipe came about after I found a jar of peanut butter that was about to go stale and a bunch of ripe bananas that needed using up. I wanted something quick and nourishing, but also a bit fun for a weekend breakfast. The idea to add chopped bacon struck me one morning when I craved salty contrast with the nutty sweetness, and it turned into a surprisingly addictive combo. Since then, these muffins have become my go-to for mornings when I need a little comfort but also want to shake things up.
Trivia and Origins of Peanut Butter Muffins
- These muffins originated from a spontaneous kitchen experiment involving leftover peanut butter and overripe bananas, blending into a quick, satisfying snack.
- Adding unexpected ingredients like chopped bacon or dark chocolate was inspired by my desire to elevate comfort food into something more indulgent and surprising.
- Peanut butter baked goods have roots in American home baking, where resourcefulness and flavor versatility keep evolving—these muffins are a modern twist.
Ingredient breakdown: key components
- Creamy peanut butter: I prefer smooth, but chunky adds a nice crunch; make sure it’s at room temp for easy mixing.
- Baking soda: It gives these muffins lift and a slight domed top; if you’re out, a touch of baking powder will do.
- Eggs: They bind everything together and add richness; slightly underbeat if you want a denser, fudgier crumb.
- Honey or maple syrup: I love how they add a subtle sweetness and moisture—adjust if you want less sugar or a more pronounced syrup flavor.
- Bananas: Ripe, mashed bananas give flavor and moisture—if you don’t have bananas, applesauce is a decent substitute but less fragrant.
- Chopped extras (chocolate, bacon, nuts): They make each muffin special—use what’s in your fridge, but toast nuts first for extra flavor.
- Flour: All-purpose works fine, but whole wheat adds a hearty texture; sift well to avoid lumps and ensure fluffy muffins.
Spotlight on key ingredients
Peanut Butter:
- Creamy peanut butter: I prefer smooth for easy mixing, but chunky adds a nice crunch. It oozes richness and nutty aroma when baked, creating that irresistible, slightly roasted scent.
- Peanut butter’s behavior: It melts into the batter, making it extra moist and flavorful. Watch for a glossy, fudgy texture—if it’s stiff out of the jar, warm it slightly for smoother blending.
Bananas:
- Ripe, mashed bananas bring a fragrant sweetness and moisture that keeps muffins tender. During baking, they soften further, releasing a warm, caramelized smell that fills the kitchen.
- Bananas’ quirks: They tend to sink or float depending on batter density. For an even crumb, fold gently and don’t overmix—overworking can lead to dense muffins with uneven pockets.
Notes for ingredient swaps
- Dairy-Free: Use coconut yogurt or almond milk in place of regular milk. Slightly less creamy, but still moist and tender.
- Gluten-Free: Swap all-purpose flour for a blend of almond and rice flour. Expect a denser crumb and nuttier flavor.
- Vegan: Replace eggs with flaxseed meal (1 tablespoon flaxseed + 3 tablespoons water per egg). The texture will be a bit more crumbly but still tasty.
- Sweetener: Use agave syrup or coconut sugar instead of honey or maple syrup. The muffins will be less moist but still sweet enough.
- Nut Butter: Swap peanut butter for almond or cashew butter. Different nutty flavor, similar gooey texture.
- Add-ins: Substitute chopped chocolate with dried cranberries or shredded coconut for a different chew and flavor profile.
- Bananas: If you don’t have bananas, mashed cooked sweet potato or pumpkin puree can add moisture and sweetness.
Equipment & Tools
- Mixing bowl: Combine ingredients thoroughly.
- Whisk: Mix wet ingredients smoothly.
- Muffin tin: Shape and bake muffins.
- Paper liners or grease: Prevent sticking and make removal easier.
- Spatula: Fold in extras and scrape batter.
- Toothpick: Test muffin doneness.
Step-by-step guide to peanut butter muffins
- Gather your equipment: a mixing bowl, a whisk, muffin tin, paper liners, and a spatula. Preheat your oven to 180°C (350°F).
- In the mixing bowl, whisk together 1 cup of all-purpose flour, 1 teaspoon baking soda, and a pinch of salt. Set aside.
- In a separate bowl, mash 2 ripe bananas until smooth. Add 1/2 cup of honey or maple syrup, 1/2 cup of creamy peanut butter, and 2 large eggs. Whisk until well combined.
- Pour the wet ingredients into the dry and fold gently with a spatula. Do not overmix; a few lumps are fine. The batter should be thick but scoopable.
- If adding extras like chopped chocolate or bacon, fold in about 1/4 cup now. Ensure even distribution without overworking the batter.
- Line your muffin tin with paper liners or lightly grease it. Using a scoop or two spoons, fill each cup about 3/4 full with batter.
- Bake in the preheated oven for 18-20 minutes. The tops should be golden, and a toothpick inserted in the center should come out clean.
- Check for doneness: the muffins should be slightly cracked on top, smell nutty and sweet, and feel firm but springy to touch.
- Remove from oven and allow to rest in the tin for 5 minutes. Then transfer to a wire rack to cool completely or serve warm.
Let the muffins cool in the tin for 5 minutes, then transfer to a wire rack. Serve warm or at room temperature, with a pat of butter or a smear of jam if desired.
How to Know It’s Done
- Golden-brown tops and cracked surface indicate doneness.
- Toothpick inserted in center comes out clean.
- Muffins feel firm but spring back when gently pressed.
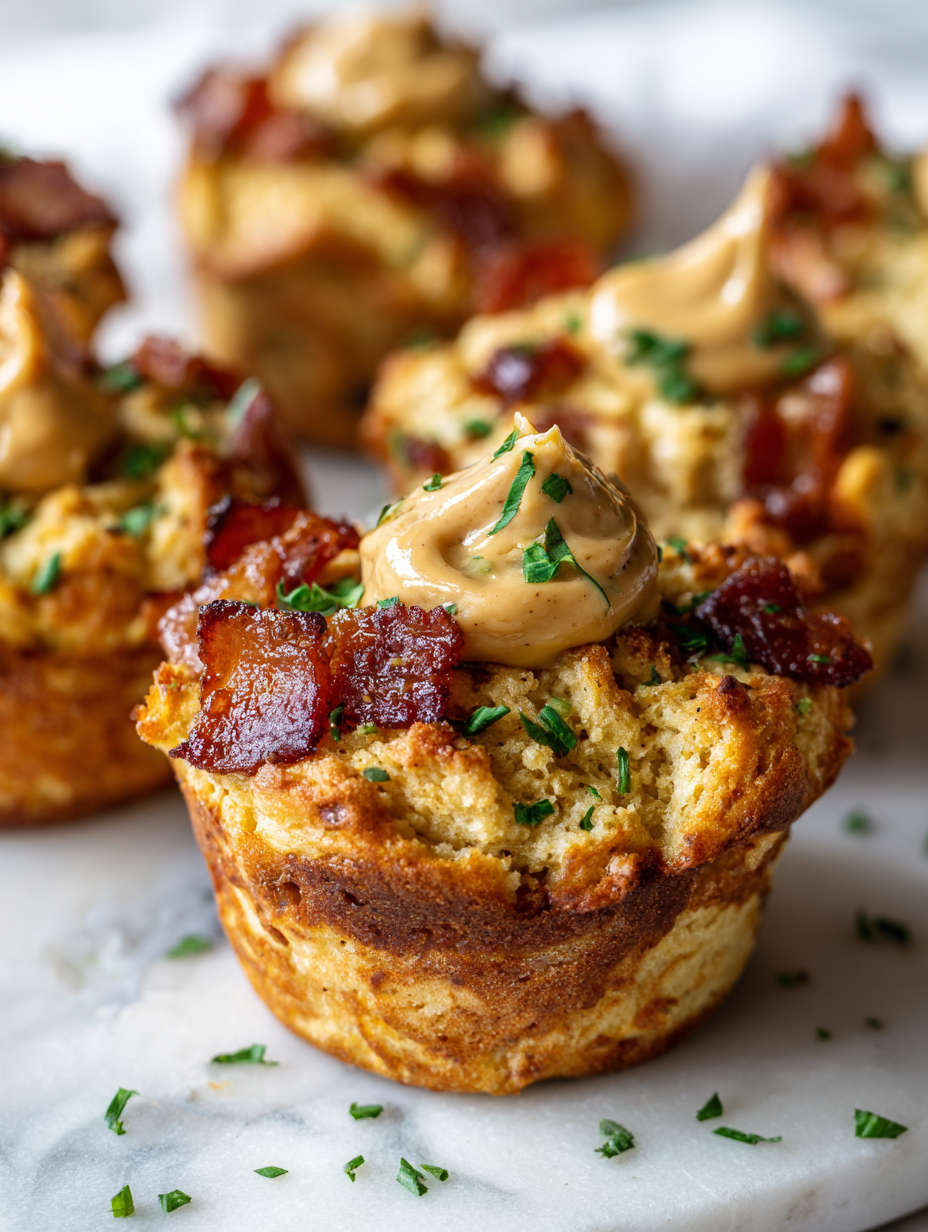
Savory Peanut Butter Bacon Muffins
Ingredients
Equipment
Method
- Preheat your oven to 180°C (350°F) and line a muffin tin with paper liners or lightly grease it.
- In a large mixing bowl, whisk together the flour, baking soda, and salt until evenly combined. This creates the dry base for your batter.
- In a separate bowl, mash the bananas until smooth and creamy. Add honey or maple syrup, peanut butter, and eggs, then whisk until the mixture is smooth and slightly frothy.
- Pour the wet mixture into the bowl with the dry ingredients. Gently fold everything together with a spatula until just combined—avoid overmixing to keep the muffins light.
- Stir in the crispy bacon bits and dark chocolate chunks if using, distributing evenly without overworking the batter.
- Scoop the batter into the prepared muffin tin, filling each cup about 3/4 full. Use an ice cream scoop or two spoons for even portions.
- Bake in the preheated oven for 18-20 minutes, or until the muffins are golden on top and a toothpick inserted into the center comes out clean.
- Remove the muffins from the oven and let them cool in the tin for about 5 minutes, allowing the crumb to set and the tops to crack nicely.
- Transfer the muffins to a wire rack to cool completely or enjoy them warm, with the aroma of roasted peanuts filling your kitchen.
- Serve the muffins as a savory breakfast or snack, perhaps with a pat of butter or your favorite jam for an extra indulgence.
Pro tips for perfect muffins
- Bolded Mini-Head: Use room temperature peanut butter for smoother, more even batter mixing.
- Bolded Mini-Head: Gently fold in chopped extras — don’t overmix to keep muffins light and fluffy.
- Bolded Mini-Head: For a shiny top, brush muffins lightly with a little melted butter halfway through baking.
- Bolded Mini-Head: Check for doneness by inserting a toothpick—if it comes out moist, give them a few more minutes.
- Bolded Mini-Head: Use an ice cream scoop for uniform muffin sizes and even baking results.
- Bolded Mini-Head: Slightly underbaking can leave muffins moist and tender—trust the colour and texture, not just time.
- Bolded Mini-Head: Let muffins rest for 5 minutes after baking—this helps set the crumb and makes removal easier.
Common mistakes and how to fix them
- FORGOT to preheat oven → Ensure oven reaches 180°C (350°F) before baking.
- DUMPED too much batter in cups → Fill muffin cups only 3/4 full to prevent overflow.
- OVER-TORCHED muffins → Remove once tops are golden and crackled, not burnt.
- MISSED resting time → Let muffins sit 5 minutes before transferring for even crumb.
Quick fixes and pantry swaps
- When batter is too thick, splash in a teaspoon of milk and fold gently.
- If muffins are flat, ensure your baking soda is fresh for proper rising.
- Patch a cracked top by brushing with a little honey before baking for shine.
- When muffins stick, shield with a light coating of oil or paper liners.
- Splash a few drops of water on muffins if they appear dry after baking.
Prep, store, and reheat tips
- Prepare the muffin batter up to 24 hours in advance; keep covered in the fridge for a fresh, just-baked taste.
- Store baked muffins in an airtight container at room temperature for 2 days, or refrigerate for up to a week. Expect a firmer crumb from refrigeration.
- For longer storage, freeze muffins individually wrapped in plastic wrap and placed in a freezer bag. They keep well for up to 3 months.
- Reheat muffins in a 180°C (350°F) oven for about 8 minutes until warm, or microwave for 20-30 seconds. Expect a soft, fragrant aroma and a gentle crackle when warm.
Top questions about peanut butter muffins
1. Can I use crunchy peanut butter?
Use natural or processed peanut butter; natural gives a richer, oilier texture, while processed is smoother and more consistent.
2. Is chunky peanut butter okay?
Yes, but expect a bit more crunch and texture in each bite, which can be quite nice with the soft muffin crumb.
3. Why are my muffins dense?
If your muffins turn out dense, check your baking soda is fresh and don’t overmix the batter—gentle folding helps.
4. How can I make muffins fluffier?
Add a pinch more baking soda or ensure your bananas are ripe enough—they release more moisture and leavening power.
5. Why are my muffins dry?
If muffins are too dry, try reducing baking time slightly or adding a splash of milk before baking.
6. How should I store leftover muffins?
Store muffins in an airtight container at room temp for 2 days, or freeze for longer storage. Reheat in the oven or microwave.
7. Can I add extras to the batter?
Adding chopped bacon or dark chocolate chunks makes the muffins savory or indulgent—try both for variety.
8. What extras work well inside these muffins?
Yes, but fold in gently to avoid deflating the batter. Toast nuts first for extra flavor and crunch.
9. How hot should the oven be?
Always preheat your oven to 180°C (350°F) before baking to ensure even rising and proper crust formation.
10. How do I know when the muffins are done?
Check for doneness by looking for a golden top, a slightly cracked surface, and inserting a toothpick that comes out clean.
Baking these peanut butter muffins is a small act of rebellion—turning a simple snack into something unexpectedly rich and satisfying. They remind me that a little curiosity in the kitchen can lead to surprisingly delightful results.
Whether you add bacon, chocolate, or keep them classic, these muffins are about embracing what’s in your pantry and making something comforting that’s also a bit fun to eat. They’re perfect for mornings when you want a quick, no-fuss treat that feels just right.

Hi, I’m Ava Bennett. Welcome to Glowing With Pride. I’m Ava Bennett, a professional chef, recipe developer, and lifelong believer that food is one of the most powerful ways we express love, identity, and joy. This space was created from years of working in professional kitchens, countless late nights behind the line, and a deep desire to share food in a way that feels personal, proud, and purposeful. Cooking has never just been my career. It has been my language.


Leave a Reply