Cooking corn muffins over an open fire isn’t just about flavor, it’s about capturing a moment. The smoky aroma, the crackling crust, it all takes me back to summer cookouts and early mornings at the campsite. There’s something primal in turning simple ingredients into a rustic, satisfying treat right beside the flames.
This recipe is my way of reconnecting with those outdoor memories, but it’s also flexible enough for a backyard grill or even a cast-iron skillet on the stove. No fancy equipment needed—just good cornmeal, a few pantry staples, and a little patience as you let that smoky goodness develop. It’s honestly about the process as much as the result, and the way those flavors deepen when you cook outdoors.
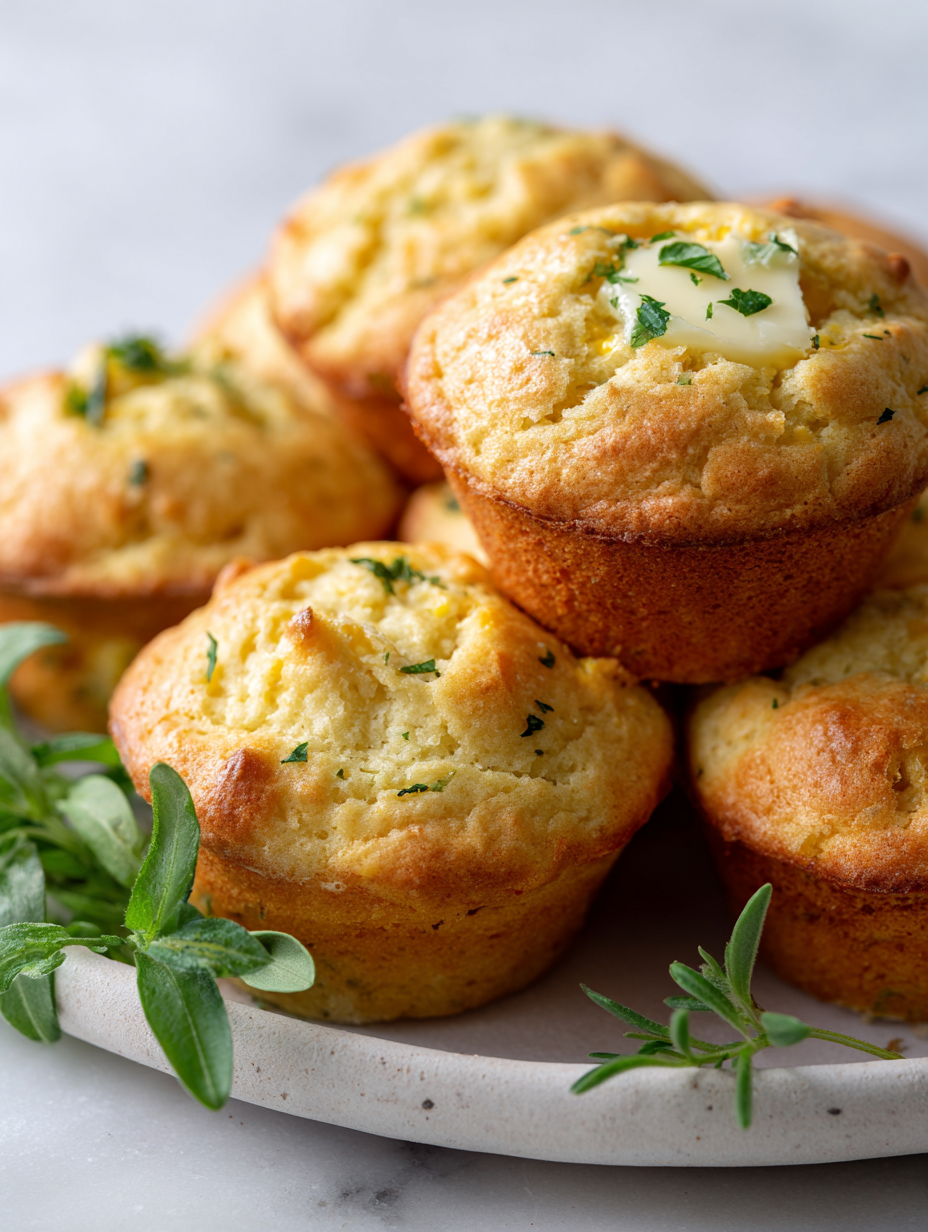
Focusing on how to adapt traditional corn muffin recipes for a rustic, open-fire cooking experience, emphasizing the smoky aroma and crackling crust that only a grill or campfire can deliver.
Rustic Corn Muffins over Fire
- Making these muffins always takes me back to lazy Sunday mornings at my grandma’s house, the smell of butter and sweet corn filling the air.
- I love how a simple batter can turn into something crusty and golden, with just a hint of smokiness if you cook them outdoors.
- There’s a quiet pride in mastering a rustic recipe that feels like a throwback to simpler times, especially when shared around a campfire or backyard grill.
The soul of this recipe
- This recipe started as a way to use up leftover cornmeal from a summer harvest, but it quickly became a staple for cozy weekend mornings. I remember the first batch turning out dense and sweet, just like the ones I loved from childhood bakeries but with a rustic twist. It’s that imperfect, slightly crumbly texture that makes these muffins feel honest and comforting.
- Over the years, I’ve tweaked the ingredients—adding a splash of honey, a pinch of spice—to make them more memorable. Baking them in a cast iron skillet gives a crackly top that’s hard to resist. It’s about embracing the rough edges, the slightly uneven rise, and the way they smell of warm corn and butter—simple, honest, satisfying.
- heading: “The soul of this recipe”
Corn Muffins History & Trivia
- Corn muffins have roots in Native American cuisine, where dried corn was ground into meal for bread and porridge.
- Early European settlers adapted indigenous recipes, creating variations that became staples in Southern American cooking.
- The classic corn muffin became a symbol of comfort food in the American South, often baked in cast iron and enjoyed at family gatherings.
- In some regions, corn muffins are associated with harvest festivals, celebrating the bounty of the land with simple, hearty baked goods.
- Modern twists, like adding jalapeños or honey, reflect the evolving traditions that keep this humble bread relevant and loved.
Ingredient breakdown: key components
- Yellow cornmeal: I love the coarse texture and rich flavor, but if you prefer a finer crumb, switch to finely ground cornmeal—just beware it might be less rustic and more uniform.
- Buttermilk: It adds tang and tenderness, but if you’re out, whole milk with a splash of lemon juice works—just expect a slightly milder, less tangy muffin.
- Eggs: They bind everything together and give structure, but for a vegan tweak, try flaxseed meal—add a tablespoon of flax to three tablespoons of water for each egg and let it sit until viscous.
- Butter: I use melted unsalted butter for richness, but olive oil or melted coconut oil can be good swaps—your muffins will have a slightly different, but still satisfying, flavor profile.
- Sweetener: A touch of honey or maple syrup brings subtle sweetness and moisture, but brown sugar or even a drizzle of agave can work if you want a different depth of flavor.
- Salt: It’s small but mighty, balancing the sweetness and highlighting the corn flavor; skip it or reduce if you’re watching salt intake, but your muffins might taste a little dull.
- Optional add-ins: Fresh jalapeños, shredded cheese, or a handful of chopped herbs can turn these muffins into a savory snack—just fold them in before baking and expect more flavor oomph.
Spotlight on key ingredients
Cornmeal:
- Yellow cornmeal: I love the coarse texture and rich flavor, but if you prefer a finer crumb, switch to finely ground cornmeal—just beware it might be less rustic and more uniform.
- Buttermilk: It adds tang and tenderness, but if you’re out, whole milk with a splash of lemon juice works—just expect a slightly milder, less tangy muffin.
- Eggs: They bind everything together and give structure, but for a vegan tweak, try flaxseed meal—add a tablespoon of flax to three tablespoons of water for each egg and let it sit until viscous.
Butter & Sweetener:
- Butter: I use melted unsalted butter for richness, but olive oil or melted coconut oil can be good swaps—your muffins will have a slightly different, but still satisfying, flavor profile.
- Sweetener: A touch of honey or maple syrup brings subtle sweetness and moisture, but brown sugar or even a drizzle of agave can work if you want a different depth of flavor.
Notes for ingredient swaps
- Dairy-Free: Use almond milk or coconut milk with a splash of vinegar instead of buttermilk. Expect a slightly different tang and richness.
- Gluten-Free: Swap all-purpose flour for a good-quality gluten-free blend. The texture might be a bit denser, but still tasty.
- Sweetener: Substitute honey or maple syrup with agave nectar or brown sugar. Each adds a unique depth and moisture.
- Eggs: For a vegan version, try flaxseed meal—mix 1 tablespoon with 3 tablespoons water per egg and let it thicken.
- Fats: Replace melted butter with olive oil or coconut oil. Expect a slightly different flavor profile, but still satisfying.
- Cornmeal: Use finely ground cornmeal for a softer crumb, or traditional coarse for a rustic, chewy bite.
- Optional Add-ins: Incorporate shredded cheese, chopped jalapeños, or herbs to amp up flavor—fold in before baking.
Equipment & Tools
- Oven: To bake the muffins evenly at the right temperature.
- Mixing bowls: Combine wet and dry ingredients separately.
- Whisk or spatula: Mix ingredients thoroughly without overworking the batter.
- Measuring cups and spoons: Ensure accurate ingredient proportions.
- Cast iron skillet or muffin tin: Shape and bake the muffins, creating that rustic crust.
- Toothpick or cake tester: Check doneness inside the muffins.
- Wire rack: Cool muffins evenly and prevent sogginess.
Step-by-step guide to Corn Muffins
- Preheat your oven to 200°C (390°F) and set a cast iron skillet or muffin tin ready. Grease well or line with paper liners.
- Gather your equipment: mixing bowls, whisk, spatula, measuring cups and spoons, and a baking brush if using skillet.
- In a large bowl, combine 1 cup of stone-ground cornmeal, 1 cup of all-purpose flour, 1 tbsp baking powder, and 1/2 tsp salt. Mix thoroughly.
- In a separate bowl, whisk together 2 large eggs, 1 cup buttermilk, and 1/4 cup melted butter until smooth. Add 1-2 tbsp honey if you like a touch of sweetness.
- Pour the wet ingredients into the dry and fold gently until just combined. Do not overmix; lumps are okay, they keep the muffins tender.
- Spoon batter into the prepared skillet or muffin tin, filling each cup about 2/3 full. If using a skillet, spread evenly.
- Bake for 15-20 minutes. Check for golden edges and a slightly crackly top. The muffins should smell sweet and corny.
- a. For muffins, insert a toothpick into the center—if it comes out clean, they’re ready. For skillet, look for puffed, golden surface.
- b. If edges are too pale, bake for an additional 2-3 minutes. If burnt or overly dark, lower the oven temperature slightly.
- c. If muffins are sinking in the middle, they need a little longer in the oven; if they’re dry, remove sooner.
- Allow to rest for 5 minutes outside the oven. For muffins, turn out onto a wire rack; for skillet, let sit briefly before slicing or serving.
- Finish with a brush of melted butter or a sprinkle of sea salt for extra flavor. Serve warm or at room temperature.
Let muffins rest for 5 minutes after baking. Serve warm with butter or honey, or cool completely before storing in an airtight container.
How to Know It’s Done
- Edges are golden and slightly crispy.
- Center of muffins feels firm but not dry when gently pressed.
- A toothpick inserted in the middle comes out clean or with few crumbs.
Rustic Corn Muffins over Fire
Ingredients
Equipment
Method
- Preheat your oven to 200°C (390°F) and prepare your skillet or muffin tin, greasing it lightly or lining with paper liners.
- In a large mixing bowl, whisk together the cornmeal, flour, baking powder, and salt until evenly combined. This creates a rustic base with a hearty texture.
- In a separate bowl, beat the eggs until frothy, then stir in the buttermilk, melted butter, and honey if using. The mixture should be smooth and slightly frothy, releasing a sweet, buttery aroma.
- Pour the wet mixture into the dry ingredients and gently fold together with a spatula or whisk until just combined. The batter will be thick with a few lumps—this keeps the muffins tender and rustic.
- Spoon the batter into the prepared skillet or muffin cups, filling each about two-thirds full. The batter should mound slightly but not overflow.
- Place the skillet or muffin tin in the oven, or set your grill with a lid to about the same temperature, and bake for 15-20 minutes. The muffins will start to turn a golden brown and release a warm, sweet aroma.
- Check for doneness by inserting a toothpick into the center of a muffin or the middle of a skillet muffin—if it comes out clean, they’re ready. The edges should be crispy and golden, with a crackly crust.
- Remove from the oven or grill and let the muffins rest for about 5 minutes. This allows the crumb to set and makes handling easier.
- Serve the muffins warm, perhaps with a pat of butter or a drizzle of honey, and enjoy the smoky, rustic flavor with a crunchy, crackling crust.
Notes
Pro tips for perfect corn muffins
- Use a hot skillet—listen for that initial crackle to ensure it’s ready.
- Don’t overmix—lumps in batter are fine and keep muffins tender.
- Check for golden edges—visual cue that they’re nearly done.
- Test with a toothpick—if it comes out clean, they’re baked through.
- Rest briefly after baking—this helps set the crumb and keeps them moist.
- For even browning—rotate the skillet halfway through baking.
- Add a pinch of sugar—enhances browning and flavor depth.
Common Corn Muffin Mistakes & Fixes
- FORGOT to check oven temperature? Use an oven thermometer for accuracy.
- DUMPED in too much flour? Lighten batter with a splash of milk and fold gently.
- OVER-TORCHED crust? Lower oven temp and cover muffins with foil if browning too quickly.
- MISSED the resting step? Let muffins cool 5 minutes for better texture and easier handling.
Quick Fixes & Pantry Swaps
- If batter is too thick, splash in a little extra buttermilk to loosen it.
- When muffins crack open unevenly, gently rotate the pan for even baking.
- Splash a few drops of water on the oven floor if crust isn’t crackling enough.
- Patch soggy muffins by placing them in a hot oven for 2 minutes to crisp the crust.
- Shield over-browning by tenting with foil halfway through baking to prevent burning.
Prep, store, and reheat tips
- Prep the dry ingredients—measure and mix the cornmeal, flour, baking powder, and salt—up to a day in advance. Keep in an airtight container for easy use.
- Mix the wet ingredients—whisk eggs, buttermilk, and melted butter—ahead of time. Store covered in the fridge for up to 24 hours, giving it a quick stir before baking.
- Batter can be made a few hours ahead and kept in the refrigerator. The flavors deepen overnight, making muffins even more rustic and flavorful.
- Store cooled muffins in an airtight container at room temperature for up to 2 days, or refrigerate for up to a week. Reheat in the oven at 180°C (350°F) for 5–7 minutes until warm and fragrant.
- For longer storage, freeze muffins individually wrapped for up to 3 months. Reheat directly from frozen, wrapped in foil, in a 180°C (350°F) oven for 10–12 minutes, until the smell of warm corn and butter fills the air.
Top questions about Corn Muffins
1. Can I use pre-ground cornmeal instead of stone-ground?
Use fresh, coarse-ground cornmeal for the best texture and flavor. Old or fine cornmeal can make muffins dense or too crumbly.
2. Can I substitute the cornmeal with flour?
Yes, but it might change the texture. Fine cornmeal will make the muffins softer, less rustic, and slightly more uniform.
3. Can I make these gluten-free?
Absolutely, but the flavor and crumb will differ. Use a gluten-free blend if you need a gluten-free version.
4. Can I use plant-based milk instead of buttermilk?
Sure, plant-based milks like almond or soy work well. Just add a splash of vinegar or lemon juice to mimic buttermilk’s tang.
5. What’s a good vegan substitute for eggs?
Yes, you can replace the eggs with flaxseed meal mixed with water. Expect slightly denser muffins with a nutty hint.
6. Can I swap butter for oil?
Use melted olive or coconut oil instead of butter. The muffins will have a different but still rich flavor.
7. How can I make these muffins more savory?
Add shredded cheese, chopped jalapeños, or herbs before baking for savory flavor boosts. Fold them into the batter just before baking.
8. How do I know when the muffins are done?
Bake in a preheated oven at 200°C (390°F). Check for golden edges and a fragrant, corny smell around 15-20 minutes.
9. How do I test if they’re baked through?
Insert a toothpick into the center—if it comes out clean, they’re ready. Also look for a crackly, golden top.
10. How should I store leftover muffins?
Store cooled muffins in an airtight container at room temp for 2 days or freeze for longer. Reheat in a warm oven for best texture.
Making these corn muffins isn’t just about the ingredients; it’s about the quiet joy of mixing, smelling that rich corn aroma, and hearing that satisfying crackle as they bake. They remind me of lazy weekend mornings and simple comforts, especially when shared with good company or enjoyed alone with a pat of butter.
In times when I need a little grounding, baking these muffins feels like a small act of mindfulness—focused on texture, aroma, and flavor. They’re humble, honest, and a gentle reminder that good things often come from simple, straightforward moments in the kitchen.

Hi, I’m Ava Bennett. Welcome to Glowing With Pride. I’m Ava Bennett, a professional chef, recipe developer, and lifelong believer that food is one of the most powerful ways we express love, identity, and joy. This space was created from years of working in professional kitchens, countless late nights behind the line, and a deep desire to share food in a way that feels personal, proud, and purposeful. Cooking has never just been my career. It has been my language.


Leave a Reply